# Sprites Documentation (Full Content)
> This file contains the complete documentation for Sprites, a product by Fly.io that provides persistent, hardware-isolated execution environments for arbitrary code.
Generated: 2026-05-14
Source: https://docs.sprites.dev/
Summary: https://docs.sprites.dev/llms.txt
---
# Getting Started
## Sprites Overview
URL: https://docs.sprites.dev/index.md
Persistent, hardware-isolated execution environments for arbitrary code

Running arbitrary code safely is hard. You need strong isolation, persistent state between runs, and fast startup times—without the complexity of managing infrastructure yourself.
Sprites are persistent, hardware-isolated Linux environments for running arbitrary code. It's like having a small, stateful computer you can spin up on demand. Unlike serverless functions, Sprites keep their filesystem and memory between runs. They're useful for things like AI agents, persistent development environments, or user-submitted code.
*Watch: A 3-minute introduction to Sprites—see how to create, execute commands, and manage persistent environments.*
## What makes Sprites different?
| Feature | Serverless Functions | Sprites |
|---------|----------------------|---------|
| **State** | Ephemeral | **Persistent** ✓ |
| **Filesystem** | Read-only or temporary | **Full ext4** ✓ — persists between runs |
| **Startup** | Cold starts (100ms–seconds) | **Instant** ✓ — wake from hibernation |
| **Billing** | Per-invocation | **Per-second** ✓ — compute free when idle |
| **Environment** | Fixed container image | **Full Linux** ✓ — install any tools |
| **Isolation** | Container-level | **Hardware-level** ✓ — dedicated microVM |
## Use Cases
Sprites are ideal for:
- **AI Code Execution** - Running code generated by language models (like Claude Code) in isolated, secure environments
- **Untrusted Code** - Isolating and executing user-submitted code safely without risking the rest of your system
- **Development Environments** - Building persistent development environments that maintain state between sessions
- **Long-lived Services** - Hosting services that go idle automatically and resume on request
- **CI/CD Tasks** - Testing code against live git repositories with full environment access
## Core Concepts
### Persistence
Every Sprite has a persistent, standard ext4 filesystem. During execution, data is written to fast NVMe storage. When the Sprite goes idle, that data is backed up to durable object storage and automatically restored when it wakes up.
### Automatic Idle Behavior
Sprites become `warm` immediately when idle, and may eventually go `cold`. While idle, there are no compute charges and your full filesystem is preserved. The Sprite wakes on the next request—`warm` Sprites resume quickly, `cold` Sprites take a bit longer.
### HTTP Access
Every Sprite gets a unique URL, making it easy to expose web services or APIs running inside, without a lot of extra setup.
## Next Steps
- [Quickstart](https://docs.sprites.dev/quickstart) - Install the CLI, create your first Sprite, and explore the features
- [CLI Reference](https://docs.sprites.dev/cli/commands) - Review the complete command documentation
---
## Quickstart
URL: https://docs.sprites.dev/quickstart.md
Get up and running with Sprites in 5 minutes

Sprites are cloud VMs that feel like persistent dev environments. You can run commands, install packages, create files—and everything stays exactly how you left it. Unlike containers that reset each time, Sprites remember your entire filesystem between sessions.
The magic: when you're not using your Sprite, it goes to sleep. Send a command or HTTP request, and it wakes up instantly. Everything is right where you left it.
This guide will walk you through creating your first Sprite. In just a few minutes, you'll have a persistent development environment that responds to HTTP traffic and remembers everything between runs.
## Install the CLI
Install with our install script (macOS/Linux):
```bash
curl -fsSL https://sprites.dev/install.sh | sh
```
This script auto-detects your platform, verifies checksums, and installs the latest Sprite CLI to `~/.local/bin`.
For Windows or manual installation, see [CLI Installation](https://docs.sprites.dev/cli/installation).
Verify installation:
```bash
sprite --help
```
## Authenticate
Sprites uses your Fly.io account for authentication:
```bash
sprite org auth
```
This opens a browser window to authenticate with Fly.io.
If authentication fails, try running `fly auth logout` followed by `fly auth login` first, then retry `sprite org auth`.
## Create Your First Sprite
```bash
sprite create my-first-sprite
```
This creates a new Sprite with default configuration, running and ready to accept commands.
Set it as your active Sprite to avoid adding `-s my-first-sprite` to every command:
```bash
sprite use my-first-sprite
```
Use `sprite list` to see all your Sprites, or `sprite destroy -s my-first-sprite` when you're done with one. You can have multiple Sprites running simultaneously—each with its own isolated environment.
## Run Commands
Execute commands in your Sprite:
```bash
# Run a simple command
sprite exec echo "Hello, Sprites!"
# Run multiple commands
sprite exec bash -c "cd /tmp && ls -la"
# Open an interactive shell
sprite console
```
**Auto-wakeup magic**: When you're not using your Sprite, it shuts down to save resources. When you run a command or hit its URL, it wakes up instantly—like magic. No manual starting or stopping required.
## See Persistence in Action
Your Sprite comes pre-configured with common development tools (Node.js, Python, Go, Git, and more). Here's the magic: **everything you install or create persists between commands**.
### Check available runtimes
See what's already installed and ready to use:
```bash
sprite exec bash -c "node --version && python3 --version && go version"
```
### Install a package
Install dependencies just like you would locally—they'll stick around:
```bash
sprite exec pip install requests
```
### Create and read files
Files you create persist across sessions. Write once, read anytime:
```bash
# Create a file
sprite exec bash -c "echo 'Hello from my persistent Sprite!' > /home/sprite/greeting.txt"
# Disconnect, get coffee, come back later...
# Everything is still there!
sprite exec cat /home/sprite/greeting.txt
sprite exec python -c "import requests; print(requests.__version__)"
```
Unlike containers that reset on each run, your Sprite keeps your installed packages, files, and entire filesystem intact.
## Start a Web Server
Every Sprite has a unique HTTP URL and can serve traffic. This makes it perfect for testing APIs, hosting prototypes, or running background services.
### Serve HTTP
First, get your Sprite's public URL:
```bash
sprite url
```
Then start a simple Python server:
```bash
sprite exec python -m http.server 8080
```
Visit the URL in your browser—you'll see Python's directory listing page. Press `Ctrl+C` to stop the server when you're done. Your Sprite automatically routes HTTP traffic to port 8080 and wakes up to handle requests.
By default, your Sprite's URL requires authentication. To make it publicly accessible, run:
```bash
sprite url update --auth public
```
The `default` auth mode requires a Sprite token with Bearer authentication.
### Test on-demand wake-up
Here's where it gets cool. Close your terminal, wait a minute, then visit the URL again. Your Sprite wakes up automatically to serve the request. That's the magic of on-demand wakeup—no manual starting or stopping required.
---
**You've got a working Sprite!** You've created a persistent environment, installed packages, created files, and served HTTP traffic—all of which will be there next time you connect. Try cloning a repo, running a build, or deploying a tiny HTTP service to see what else you can do.
## Using the SDKs
The CLI is perfect for day-to-day development, but if you're building tools, automation workflows, or integrating Sprites into your application, the SDKs give you programmatic control. Use them to dynamically create environments, orchestrate workloads, or embed Sprites into your product.
**JavaScript:**
```javascript
import { SpritesClient } from '@fly/sprites';
const client = new SpritesClient(process.env.SPRITE_TOKEN);
const sprite = await client.createSprite('my-sprite');
// Execute a command
const result = await sprite.execFile('python', ['-c', "print('hello')"]);
console.log(result.stdout);
// Stream output from long-running commands
const cmd = sprite.spawn('bash', ['-c', 'for i in {1..10}; do date +%T; sleep 0.5; done']);
for await (const line of cmd.stdout) {
process.stdout.write(line);
}
await sprite.delete();
```
**Go:**
```go
package main
import (
"context"
"fmt"
"io"
"os"
sprites "github.com/superfly/sprites-go"
)
func main() {
ctx := context.Background()
client := sprites.New(os.Getenv("SPRITE_TOKEN"))
sprite, _ := client.CreateSprite(ctx, "my-sprite", nil)
defer client.DeleteSprite(ctx, "my-sprite")
// Execute a command
cmd := sprite.Command("python", "-c", "print('hello')")
output, _ := cmd.Output()
fmt.Println(string(output))
// Stream output from long-running commands
cmd = sprite.Command("bash", "-c", "for i in {1..10}; do date +%T; sleep 0.5; done")
stdout, _ := cmd.StdoutPipe()
cmd.Start()
io.Copy(os.Stdout, stdout)
cmd.Wait()
}
```
**Elixir:**
```elixir
client = Sprites.new(System.get_env("SPRITE_TOKEN"))
{:ok, sprite} = Sprites.create(client, "my-sprite")
# Execute a command
{output, 0} = Sprites.cmd(sprite, "python", ["-c", "print('hello')"])
IO.puts(output)
# Stream output from long-running commands
sprite
|> Sprites.stream("bash", ["-c", "for i in {1..10}; do date +%T; sleep 0.5; done"])
|> Stream.each(&IO.write/1)
|> Stream.run()
Sprites.destroy(sprite)
```
---
## Next Steps
- [Working with Sprites](https://docs.sprites.dev/working-with-sprites) - Sessions, ports, persistence, and everything beyond the basics
- [CLI Reference](https://docs.sprites.dev/cli/commands) - Complete command-line documentation
---
## Working with Sprites
URL: https://docs.sprites.dev/working-with-sprites.md
Beyond the basics—sessions, ports, persistence, and everything you need to build real stuff

After you've made it through the [Quickstart](https://docs.sprites.dev/quickstart), you've got a working Sprite and a basic idea of how to use it. This guide picks up from there: how to run commands, manage sessions, keep processes alive, and make sure your environment stays consistent over time. The first half covers everything you need to build and deploy real stuff. The rest is there when you're ready to go deeper.
---
## Running Commands and Sessions
Sprites give you three main ways to interact:
### `sprite exec` – One-off commands and automation
Run a single command, wait for it to finish, get the output. Perfect for scripts, package installs, or quick checks.
```bash
sprite exec ls -la
sprite exec npm install express
sprite exec -tty vim
```
- Blocks until the command completes
- Returns stdout/stderr
- Use for automation or scripting
### `sprite console` – Interactive shell (like SSH)
Opens a full terminal session so you can explore, debug, or run multiple commands.
```bash
sprite console
# Inside:
# $ cd /home/sprite && ls -la && vim myfile.txt
```
- TTY enabled
- Stays open until you exit
- Use for manual work or debugging
### Sessions – Keep things running
All TTY sessions are automatically detachable. Start a command, disconnect with `Ctrl+\`, and reattach later. Great for dev servers, long builds, or background processes.
```bash
sprite exec -tty npm run dev # start a TTY session
# Press Ctrl+\ to detach
sprite sessions list # list running sessions
sprite s ls # short form list sessions
sprite sessions attach # reattach to session
sprite sessions kill # kill session
```
---
## Sprite Lifecycle: Idle Behavior and Persistence
When activity stops, Sprites immediately become `warm`. Over time they may transition to `cold`. `warm` Sprites resume quickly; `cold` Sprites take longer to wake. That means:
### What Persists (and What Doesn't)
**Filesystem persists**: All files, installed packages, git repos, databases—everything on disk stays intact
**RAM doesn't persist**: Running processes stop, in-memory data is lost
**Network config persists**: Open ports, URL settings, SSH access all remain configured
This means you can install dependencies once and they're there forever. But if you're running a web server, it'll need to restart when the Sprite wakes up.
### Wake-up Behavior
Wake-up is fast:
- ~100–500ms for normal wakes
- 1–2s on cold starts
When a request hits your Sprite's URL, it wakes automatically. To make sure your web server is ready to handle that request, use **Services** — processes that auto-restart whenever your Sprite wakes up:
```bash
sprite-env services create my-server --cmd node --args server.js
```
Services survive hibernation. TTY sessions don't — they're great for interactive work and debugging, but any process started with `sprite exec` or `sprite console` stops when the Sprite sleeps.
### Idle Detection
Your Sprite stays awake while there's activity, and sleeps when there isn't. Activity includes:
- Active exec/console commands
- Open TCP connections (like your app's URL)
- Running TTY sessions
- Active Services with open connections
---
## Networking: URLs and Port Forwarding
Every Sprite gets a URL: `https://.sprites.app`
### HTTP Access
```bash
sprite url # see URL
sprite url update --auth public # make public
sprite url update --auth default # make private again
```
- Routes to port 8080 by default (or first HTTP port opened)
- Wakes the Sprite on request — pair with a [Service](#wake-up-behavior) so your server is ready to handle it
- Private by default (auth token required)
**Security note**: Public URLs expose your Sprite to the internet. Only use public mode for demos, webhooks, or non-sensitive work.
### Port Forwarding
```bash
sprite proxy 5432 # access Sprite's port 5432 at localhost:5432
sprite proxy 3001:3000 # map local 3001 to remote 3000
sprite proxy 3000 8080 5432 # forward multiple ports
```
Use for database access, dev tools, or private ports. Press `Ctrl+C` to stop forwarding.
### Port Conflicts
If a local port is already in use, you'll get an error. Solutions:
1. **Choose a different local port**: `sprite proxy 3001:3000` forwards local 3001 to remote 3000
2. **Stop the conflicting process**: Find what's using the port with `lsof -i :3000` (macOS/Linux)
3. **Kill the old proxy session**: If you have an old proxy still running, stop it first
---
## Your Environment
Sprites run Ubuntu 25.10 with common tools preinstalled:
- **Languages**: Node.js, Python, Go, Ruby, Rust, Elixir, Java, Bun, Deno
- **AI/CLI Tools**: Claude CLI, Gemini CLI, OpenAI Codex, Cursor
- **Utilities**: Git, curl, wget, vim, and common dev tools
### Filesystem Basics
- **`/home/sprite/`** — your home directory, put your stuff here
- **`/home/sprite/.local/`** — for local binaries and user-installed tools
- **`/opt/`** — good for standalone applications
- **`/var/`** — for databases and application state
Install packages like you would locally:
```bash
sprite exec pip install pandas numpy
sprite exec npm install -g typescript
sprite exec cargo install ripgrep
```
They persist across hibernation. No rebuilds needed.
**Storage space**: Each Sprite has 100 GB of persistent storage. Check usage with:
```bash
sprite exec df -h
```
---
## Managing Sprites
### Set Active Sprite
```bash
sprite use my-sprite
# Now all commands target this sprite
sprite exec echo "hello world"
```
### List and Filter
```bash
sprite list
sprite list --prefix "dev-"
```
### Destroy
```bash
sprite destroy -s my-sprite
```
**Destruction is irreversible!** All data is permanently deleted: files, packages, checkpoints. No undo.
---
## Checkpoints
Snapshot your Sprite's filesystem so you can roll back later.
```bash
sprite checkpoint create
sprite checkpoint create --comment "before upgrade"
sprite checkpoint list
sprite restore
```
Use before risky changes, upgrades, or experiments.
**What gets saved:**
Entire filesystem (all files, installed packages, databases)
File permissions and ownership
Running processes (they stop during checkpoint creation)
In-memory state
**Good to know:**
- Checkpoints count against your storage quota
- Restoring replaces the entire filesystem—changes since the checkpoint are lost
- Creation takes 10–30 seconds depending on data size
---
## Optional: Going Deeper
These features are useful once you're comfortable.
### Mounting Filesystem Locally
Use SSHFS to mount your Sprite and edit files with your local tools.
Sprites don't expose SSH directly—you'll need to install an SSH server on your
Sprite and tunnel the connection through `sprite proxy`. This keeps your Sprite
secure while still allowing local filesystem access.
**Prepare an SSH server on your Sprite:**
```bash
# Install OpenSSH
sudo apt install -y openssh-server
# Create a service to automatically start it
sprite-env services create sshd --cmd /usr/sbin/sshd
```
**Install SSHFS on your local machine:**
```bash
# macOS
brew install macfuse sshfs
# Ubuntu/Debian
sudo apt-get install sshfs
# Fedora/RHEL
sudo dnf install fuse-sshfs
```
**Authorize your SSH public keys:**
```bash
sprite exec mkdir -p .ssh
cat ~/.ssh/id_*.pub | sprite exec tee -a .ssh/authorized_keys
```
**Add this helper to your shell config:**
```bash
# Add to ~/.zshrc or ~/.bashrc
spritemount() {
local sprite_name="$1"
local mount_point="/tmp/sprite-mount"
mkdir -p "$mount_point"
sshfs -o reconnect,ServerAliveInterval=15,ServerAliveCountMax=3 \
-o ProxyCommand="sprite proxy -s %h -W 22" "sprite@$sprite_name:" \
"$mount_point"
cd "$mount_point" || return 1
}
# Mount the sprite with "spritemount my-sprite"
```
**Unmount when done:**
```bash
umount /tmp/sprite-mount
# macOS may need: diskutil umount /tmp/sprite-mount
```
### Common Error Scenarios
**Connection errors:**
- Check auth: `sprite org auth`
- Verify Sprite exists: `sprite list`
- Wait a moment and retry
**Timeout errors:**
- Be patient on first wake-up (1–2 seconds)
- Check if command actually needs that long
**Sprite won't wake up:**
- Verify it exists with `sprite list`
- Wait 30 seconds and retry
- [Contact support](https://fly.io/dashboard/support) if persistent
**Storage full:**
- Clean up files: `sprite exec bash -c "du -sh /home/sprite/*"`
- Delete old checkpoints
- Create a new Sprite for additional workloads
**Quick debugging:**
```bash
sprite exec ps aux # running processes
sprite exec df -h # disk space
sprite exec free -h # memory usage
```
---
Sprites are meant to feel like your own Linux box in the sky—fast to wake, persistent when you need it, and flexible enough to run whatever weird stack you're building. As you get more comfortable, the advanced features are there when you need them.
---
## Keeping a Sprite Running
URL: https://docs.sprites.dev/keeping-sprites-running.md
Use the Tasks API to hold a Sprite open while an agent or other long-lived process is doing work
A Sprite pauses in two stages. It first goes `warm`: compute billing stops, the VM suspends, and the next inbound HTTP request wakes it in 100–500ms with process state preserved. If the Sprite stays idle long enough it transitions to `cold`. In-memory state is dropped and the next wake takes 1–2s.
Either way, work-in-progress stalls:
- **Open TCP connections drop on the pause, even on warm.** A websocket subscriber, a queue worker's broker connection, an agent's streaming API call: the remote end can't be held across the suspension.
- **Process state pauses on warm, dies on cold.** A warm-paused agent loop resumes its work on wake; a cold one starts over.
The Tasks API stops that pause. Register a task; the Sprite stays up. Delete it (or let it expire); the Sprite is free to pause again.
The model: a task is a hold on the current run. While at least one task is live, the Sprite runs.
## When to use it
- AI coding agents running in the background (Claude Code, Codex) that should still be there when you come back
- Queue workers waiting on jobs from an external broker
- Anything holding outbound connections: websockets, MQTT, replication streams
If you only need a process to come *back* after a pause, use a Service instead. A Service is a long-running process managed by the Sprite runtime: it auto-starts on boot, keeps running through a warm wake (the process is frozen, not terminated), and restarts automatically on a cold wake. Tasks keep the *current* run alive. They compose: a Service launches the agent, the agent registers a task while it's working.
## When not to use it
- A web server with no other long-lived state. A Service plus the URL's wake-on-request handles that without paying for compute while the Sprite is idle.
- A short script. Just run it and the Sprite stays up while it runs.
- Anything you might forget to clean up. A single forgotten task expires on its own, but a forgotten heartbeat loop keeps the Sprite billing until you notice.
## The basics
All Tasks API calls go to the management socket at `/.sprite/api.sock`. Plain HTTP, JSON body, virtual host `sprite`. Inside a Sprite, `sprite-env curl` is a shorthand that handles the socket and host. `sprite-env curl -X POST /v1/tasks -d '...'` is equivalent to the long form below; this guide uses the explicit `curl --unix-socket` form to keep the wire-level mechanics visible.
Create a task. The Sprite is now held in an active state for an hour (the maximum lifetime per task):
```bash
curl --unix-socket /.sprite/api.sock \
-H "Content-Type: application/json" \
-X POST http://sprite/v1/tasks \
-d '{ "name": "agent", "expire": "1h" }'
```
Refresh it before it expires:
```bash
curl --unix-socket /.sprite/api.sock \
-H "Content-Type: application/json" \
-X PUT http://sprite/v1/tasks/agent \
-d '{ "expire": "1h" }'
```
Release the hold when done:
```bash
curl --unix-socket /.sprite/api.sock \
-X DELETE http://sprite/v1/tasks/agent
```
## The heartbeat pattern
A single task expires after at most an hour, so anything that needs to run longer uses a heartbeat: a short expiry, refreshed on a shorter interval, deleted on exit. If the process crashes without cleaning up, the task expires on its own and the Sprite pauses.
```bash
#!/usr/bin/env bash
set -euo pipefail
api() {
curl -s --unix-socket /.sprite/api.sock \
-H "Content-Type: application/json" "$@"
}
trap 'api -X DELETE http://sprite/v1/tasks/agent' EXIT
while true; do
api -X PUT http://sprite/v1/tasks/agent -d '{ "expire": "5m" }' >/dev/null
sleep 60
done
```
A 5-minute expiry refreshed every minute is a reasonable default: four missed heartbeats of margin before the Sprite frees itself, and short enough that a forgotten task doesn't drag on.
## Verifying
```bash
curl --unix-socket /.sprite/api.sock http://sprite/v1/tasks
```
You should see your task with a future `expires_at`. If the list is empty, the Sprite isn't held and will pause on the next idle window.
## Tasks API reference
HTTP/JSON over `/.sprite/api.sock`, virtual host `sprite`.
### List
```text
GET /v1/tasks
```
```json
{ "tasks": [ { "name": "agent", "started_at": "...", "expires_at": "..." } ] }
```
### Get
```text
GET /v1/tasks/:name
```
200 with the task, 404 if missing.
### Create
```text
POST /v1/tasks
{ "name": "my-task", "expire": "1h" }
```
`expire` is seconds (integer) or a duration string (`"30m"`, `"1h"`). Maximum is 1 hour; longer holds require refreshing (see Upsert below). 201 on success, 409 if the name is taken.
### Upsert
Either form works. Creates the task or refreshes its expiry. Returns 200.
```text
PUT /v1/tasks/:name
{ "expire": "1h" }
```
```text
PUT /v1/tasks
{ "name": "my-task", "expire": "1h" }
```
### Delete
```text
DELETE /v1/tasks/:name
```
204 on success, 404 if missing.
---
## Sprite Maintenance
URL: https://docs.sprites.dev/sprite-maintenance.md
Keeping your Sprites happy and healthy
Sprites are persistent. Everything you leave is there when you come back, including the software. Long-living Sprites still need regular updates. This guide walks through some of the common tasks for maintaining the software environment in your Sprite.
---
## OS Upgrades
New Sprites run on a fresh install of Ubuntu 25.10. Older Sprites created with Ubuntu 25.04 must upgrade to continue receiving security and feature updates.
If you don't know what version of Ubuntu your Sprite currently runs, check with:
```bash
cat /etc/*release
```
Fortunately, Sprites are disposable. If your workload doesn't require the Sprite to live long-term, upgrading is easy: destroy the Sprite and create a new one! If you need to copy files over, try [mounting the filesystem locally](https://docs.sprites.dev/working-with-sprites/#mounting-filesystem-locally).
If creating a new Sprite is impractical, you can also upgrade Ubuntu in-place. Keep in mind that bundled software (such as agents and language toolchains) must be upgraded separately. Install the Ubuntu upgrader with:
```bash
sudo apt update
sudo apt install ubuntu-release-upgrader-core
```
With the upgrader installed, follow the [official instructions](https://ubuntu.com/server/docs/how-to/software/upgrade-your-release/) from Ubuntu. In short:
```bash
# upgrade to the latest packages for the current release
sudo apt upgrade
# checkpoint the filesystem
sprite-env checkpoints create --comment "Before Ubuntu upgrade"
# switch to the new release
sudo do-release-upgrade
# upgrade installed packages to the new release
sudo apt full-upgrade
```
---
# Concepts
## Connectors
URL: https://docs.sprites.dev/concepts/connectors.md
Give Sprites access to external APIs without putting provider credentials inside the Sprite
A Sprite that needs to talk to Slack, GitHub, OpenRouter, or another HTTP API runs into the same problem: where does the credential live? Pasting a token into the Sprite's environment works, but every Sprite that needs that token now holds a copy of a long-lived secret. Rotating it means touching every Sprite. Auditing access means reading process environments. Revoking it for one Sprite means revoking it for all of them.
Connectors solve this by storing the credential once, in your organization, and routing API calls through the Sprites gateway. Sprites never see the token. You decide which Sprites can use a connector and which provider endpoints they can reach.
## How it works
A connector has three pieces:
1. **A credential** — an OAuth token, your own API key, or a managed provider that's part of your Sprites plan. Stored encrypted in your organization's database. The token itself is never returned by the API.
2. **An access policy** — rules that decide which of your Sprites may use the connector, and which provider paths they may reach. **Deny-by-default**: a connector with no policy refuses every Sprite.
3. **A gateway endpoint** — `https://api.sprites.dev/v1/gateway///`. A Sprite calls this URL; Sprites authenticates the call using the requesting Sprite's identity, checks the policy, and forwards to the provider with the stored credential attached.
The Sprite never holds the provider token. It only knows the connector ID and the gateway URL.
## Providers
| Provider | Credential style | Notes |
| --- | --- | --- |
| Slack as User | OAuth (user token) | Acts as the user who authorized. |
| Slack as Bot | OAuth (bot token) | Acts as the bot user for that workspace. |
| GitHub | OAuth | Personal or org-scoped depending on requested scopes. |
| OpenRouter | API key (BYOK) **or** managed | Bring your own OpenRouter key, or use the managed OpenRouter connector — billed as part of your Sprites plan. |
| Custom API | API key + base URL | Wraps any token-authenticated HTTP API. |
## Setting up a connector
Most connector management happens in the dashboard. Open your organization, then **Connectors**. You'll see what's already configured, grouped into "Managed by Sprites" (provided by your plan) and "Your connections" (everything you've added yourself).
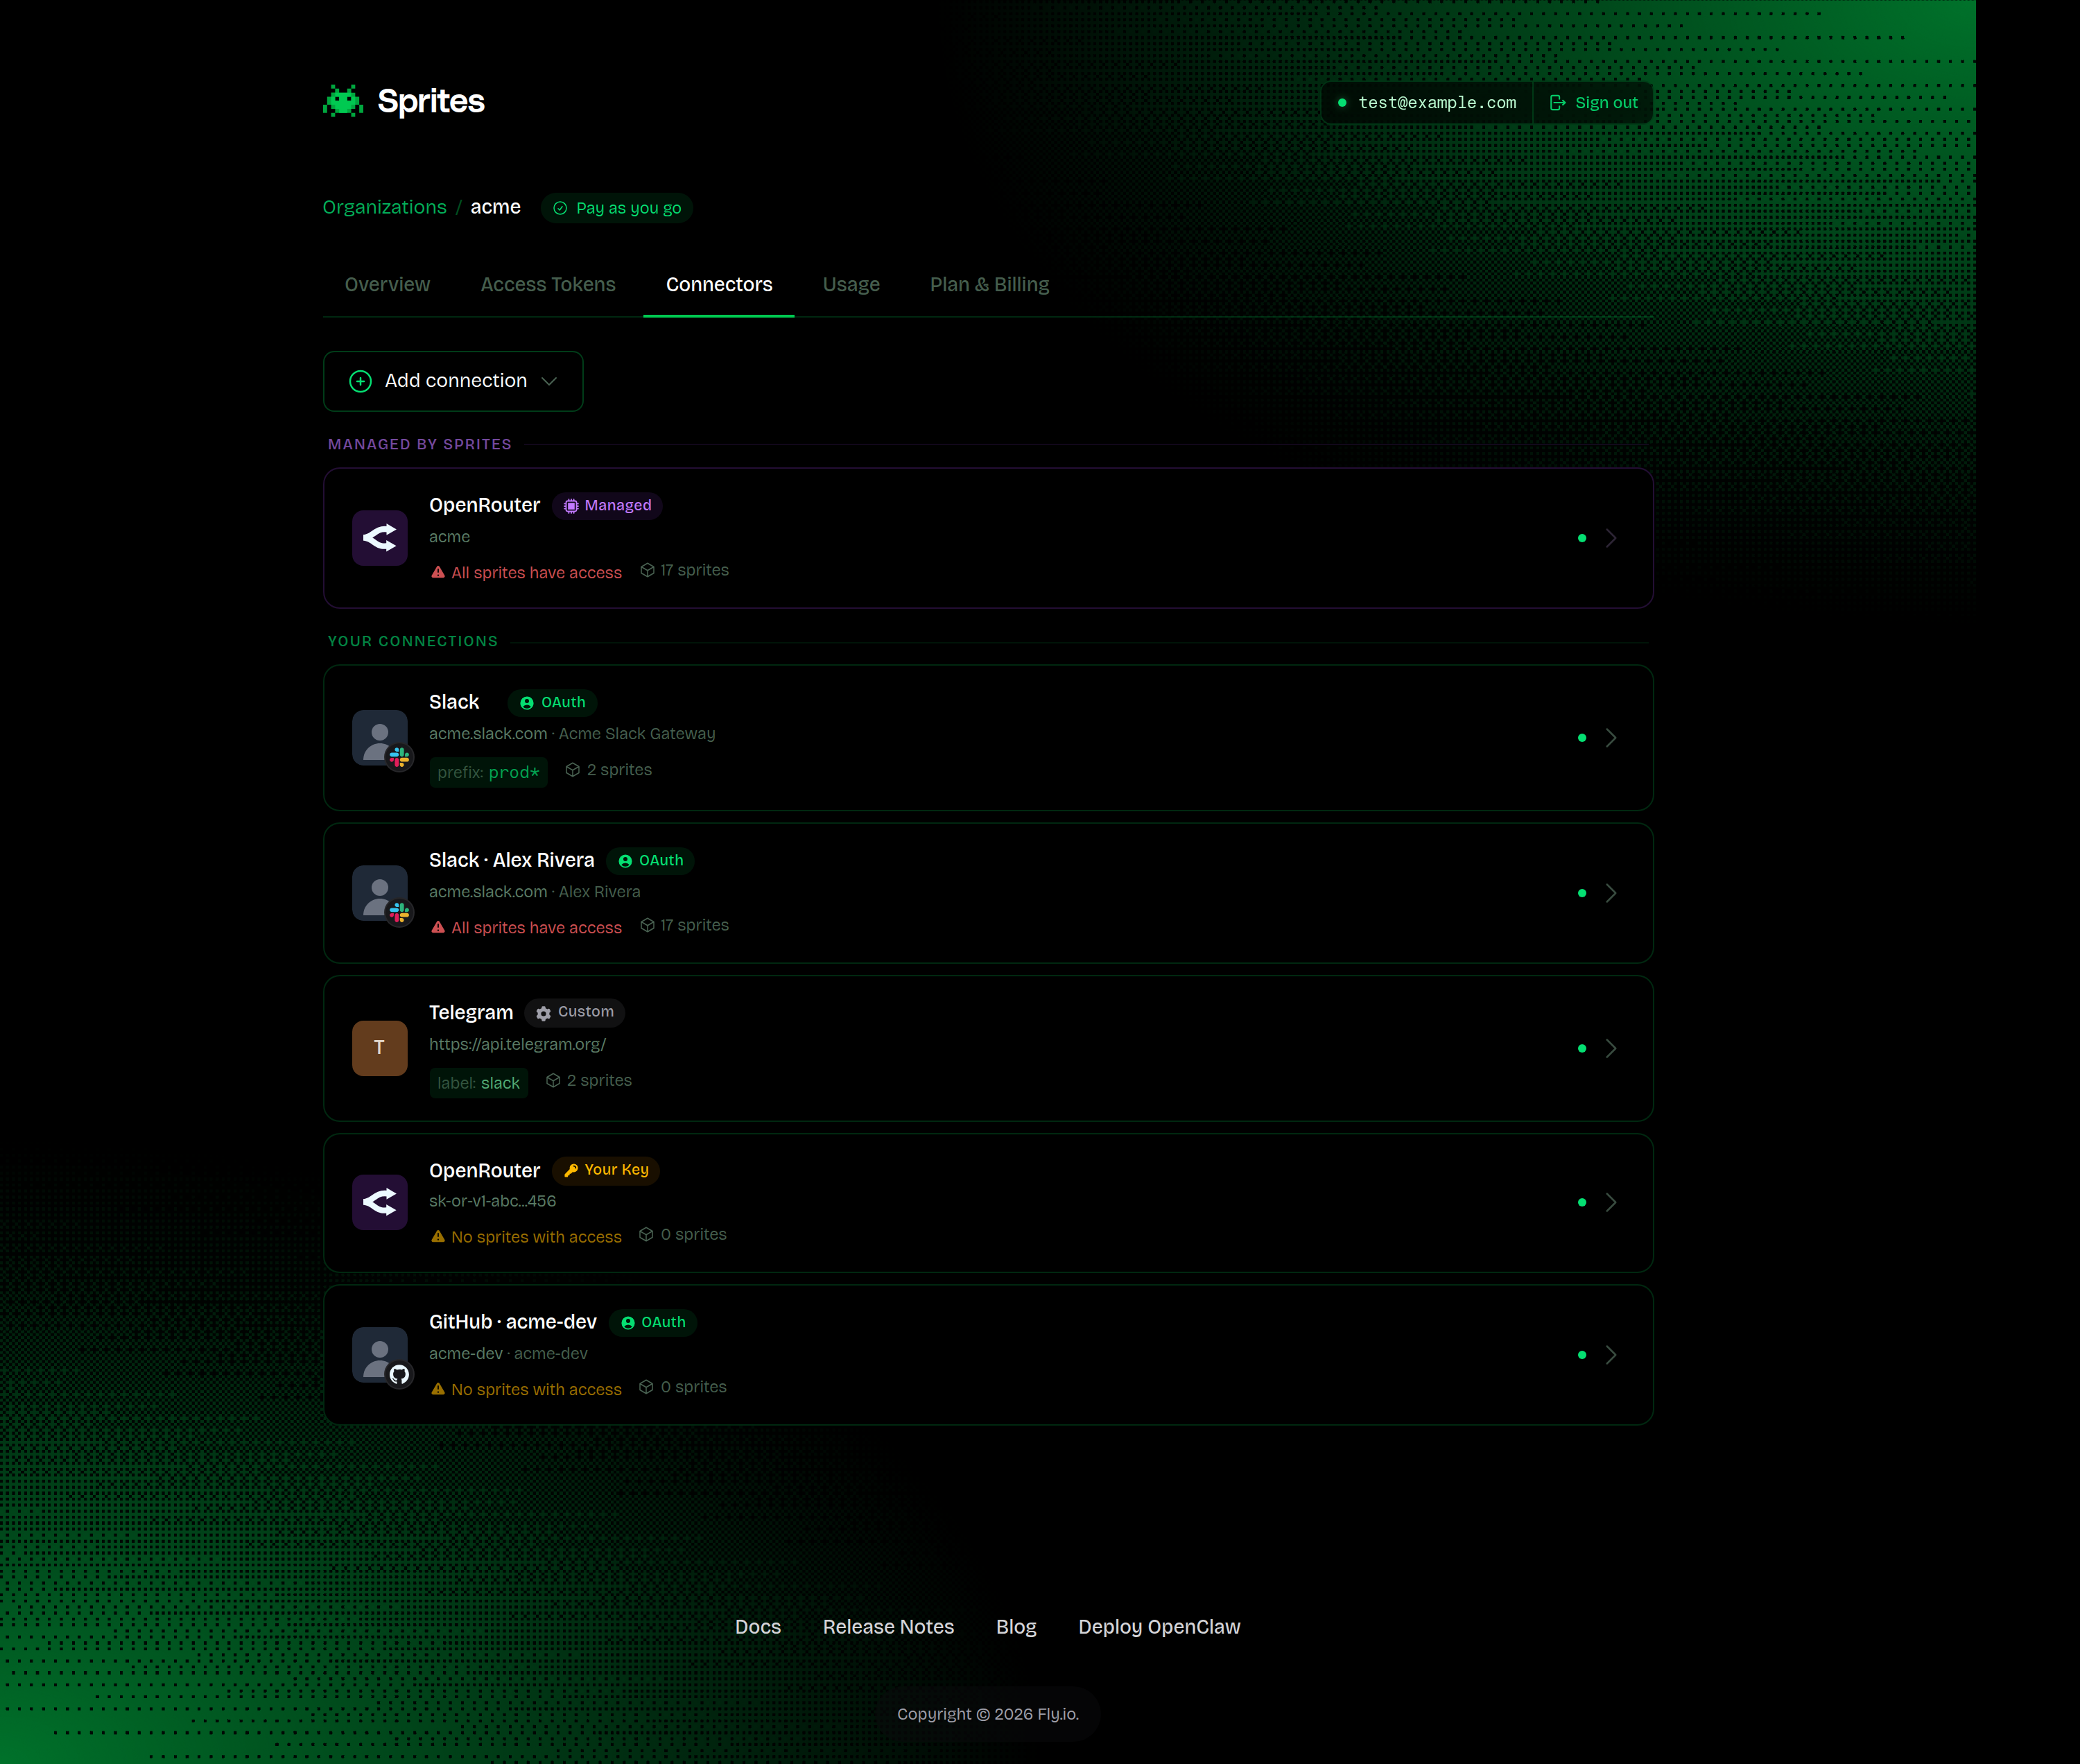
Click **Add connection** to pick a provider:
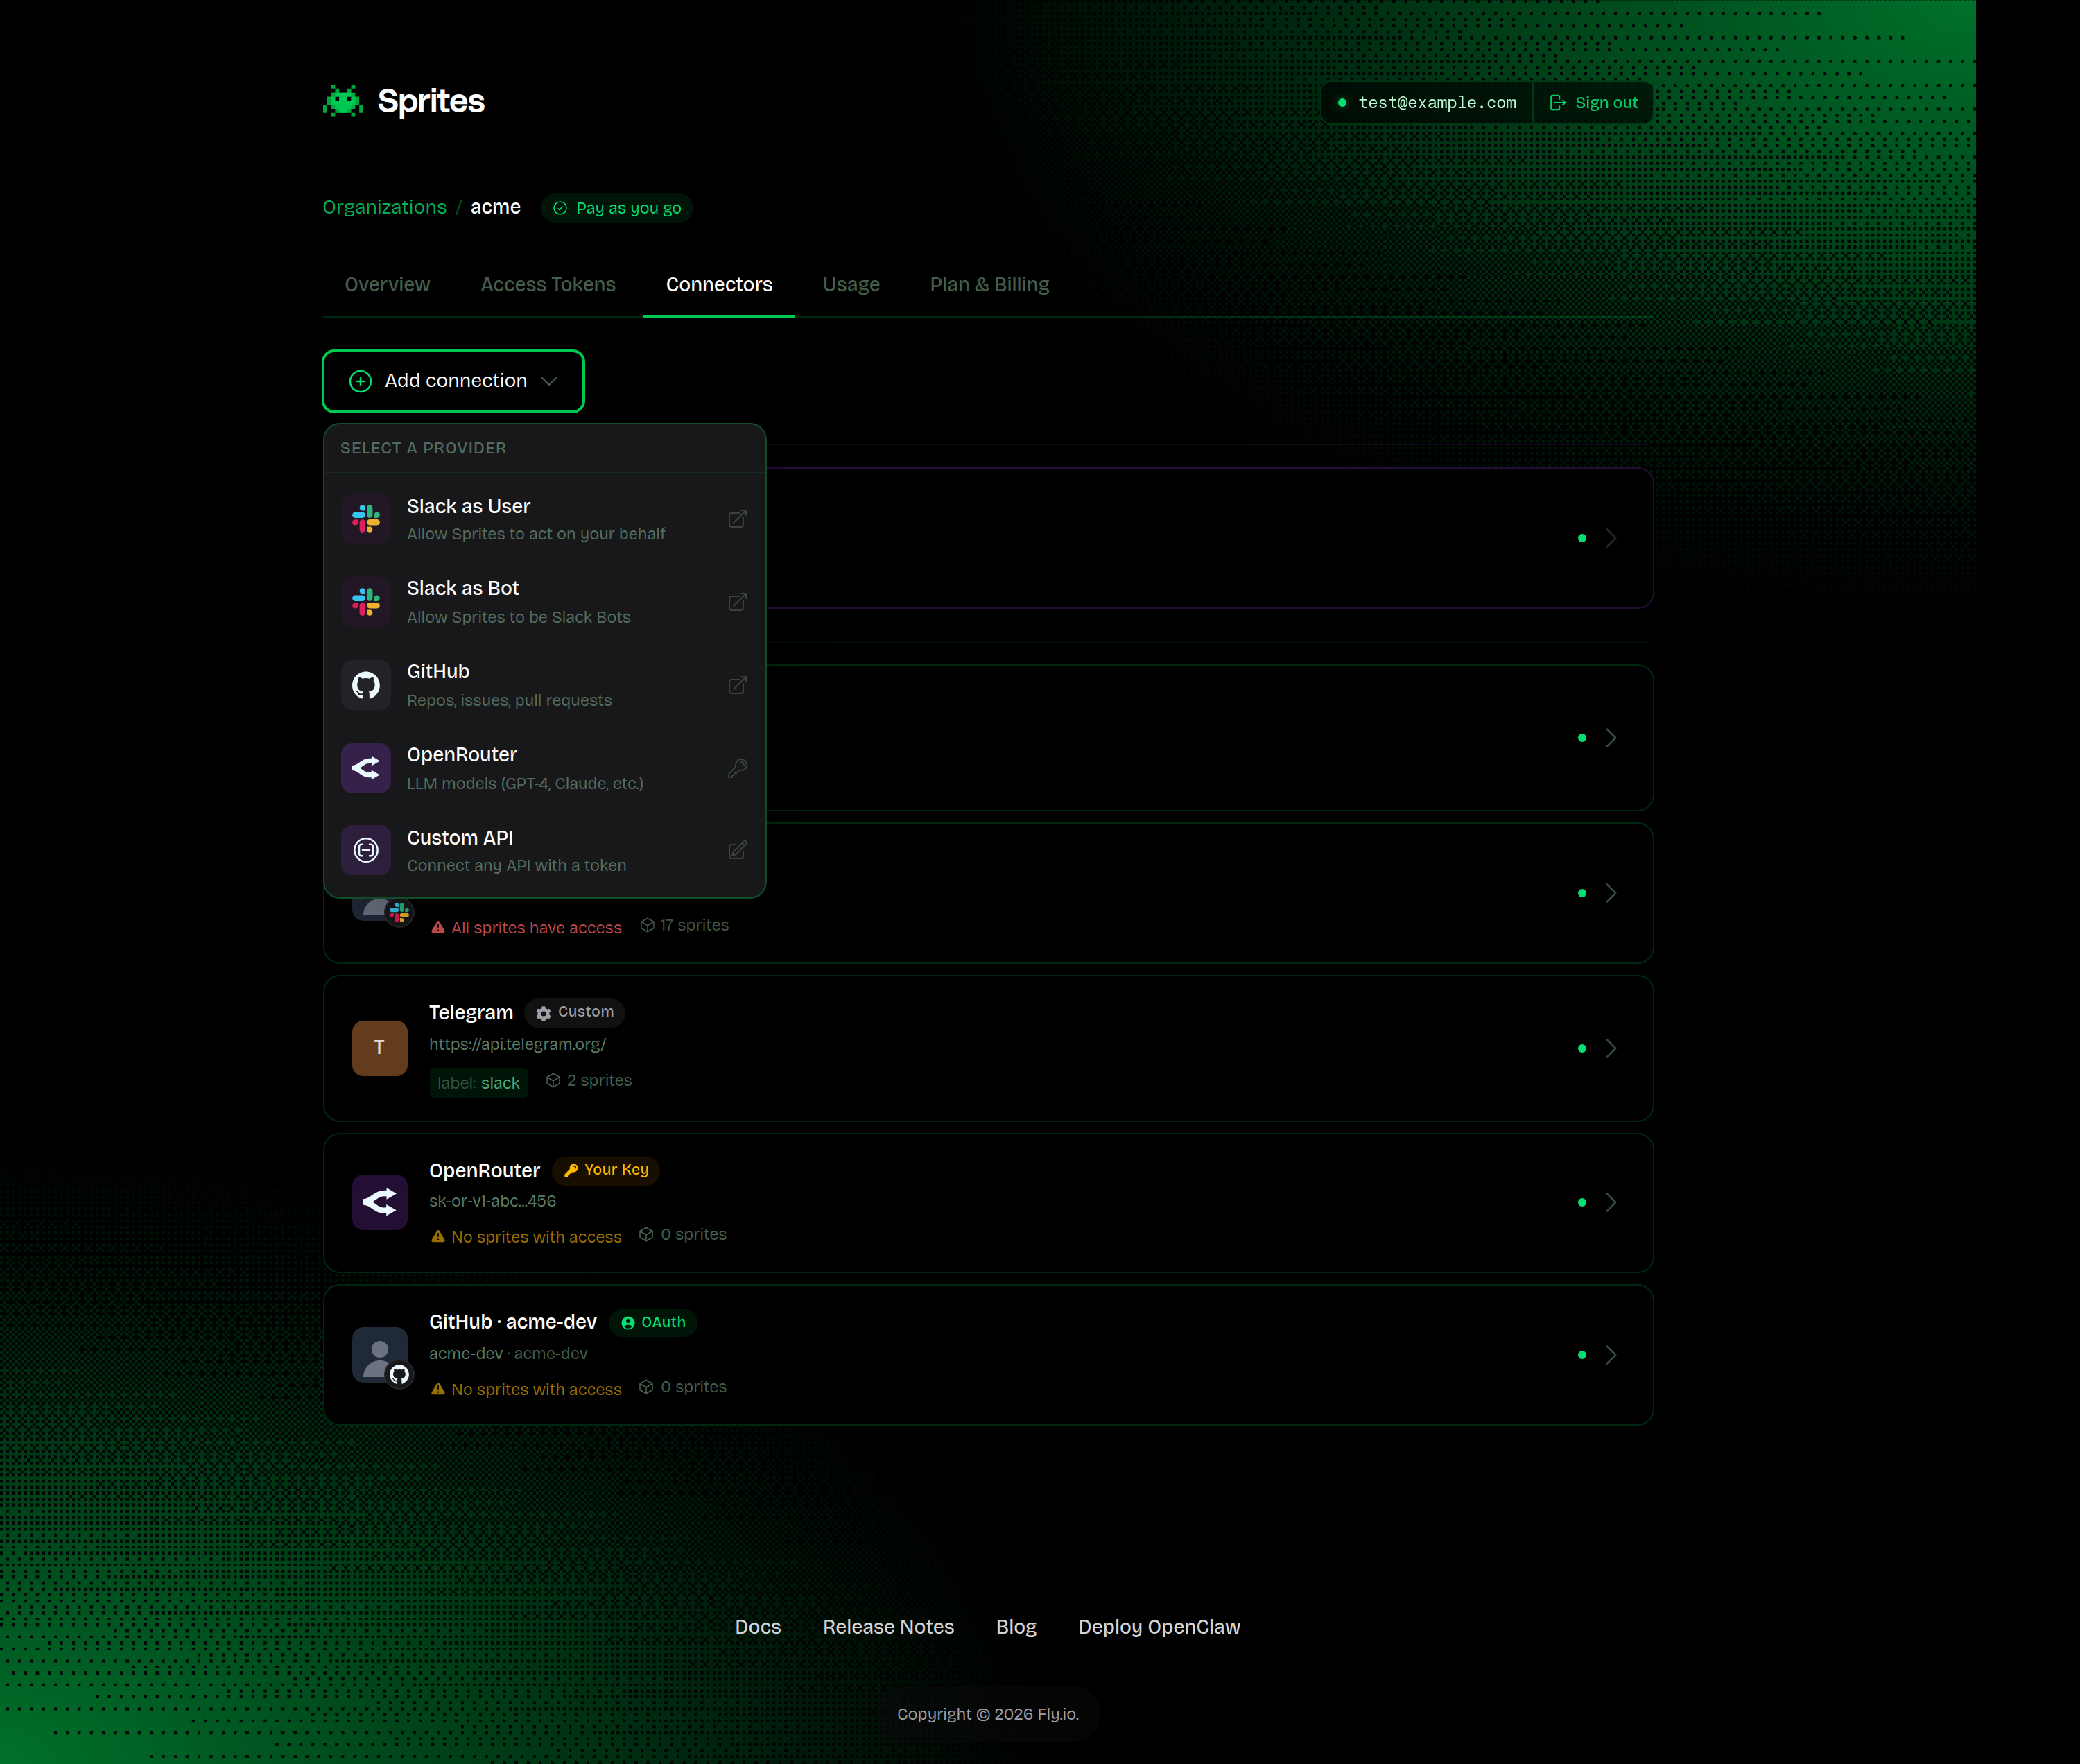
What happens next depends on the provider:
- **Slack, GitHub** — you're sent through the provider's OAuth consent screen in a new tab. After you approve, the connector appears in **Your connections** with the scopes you granted.
- **OpenRouter** — choose between bringing your own key (paste it in) or enabling the managed connector with one click.
- **Custom API** — fill in the base URL, the token, where the token goes (header / query string / URL path), and an optional test request to verify it works before saving.
Newly created connectors show up in the list immediately. Until you grant access to at least one Sprite, the connector is dormant — it exists, but no Sprite can use it.
## Configuring access
Click any connector to open its detail page. This is where you control which Sprites can use it and what they can do with it.
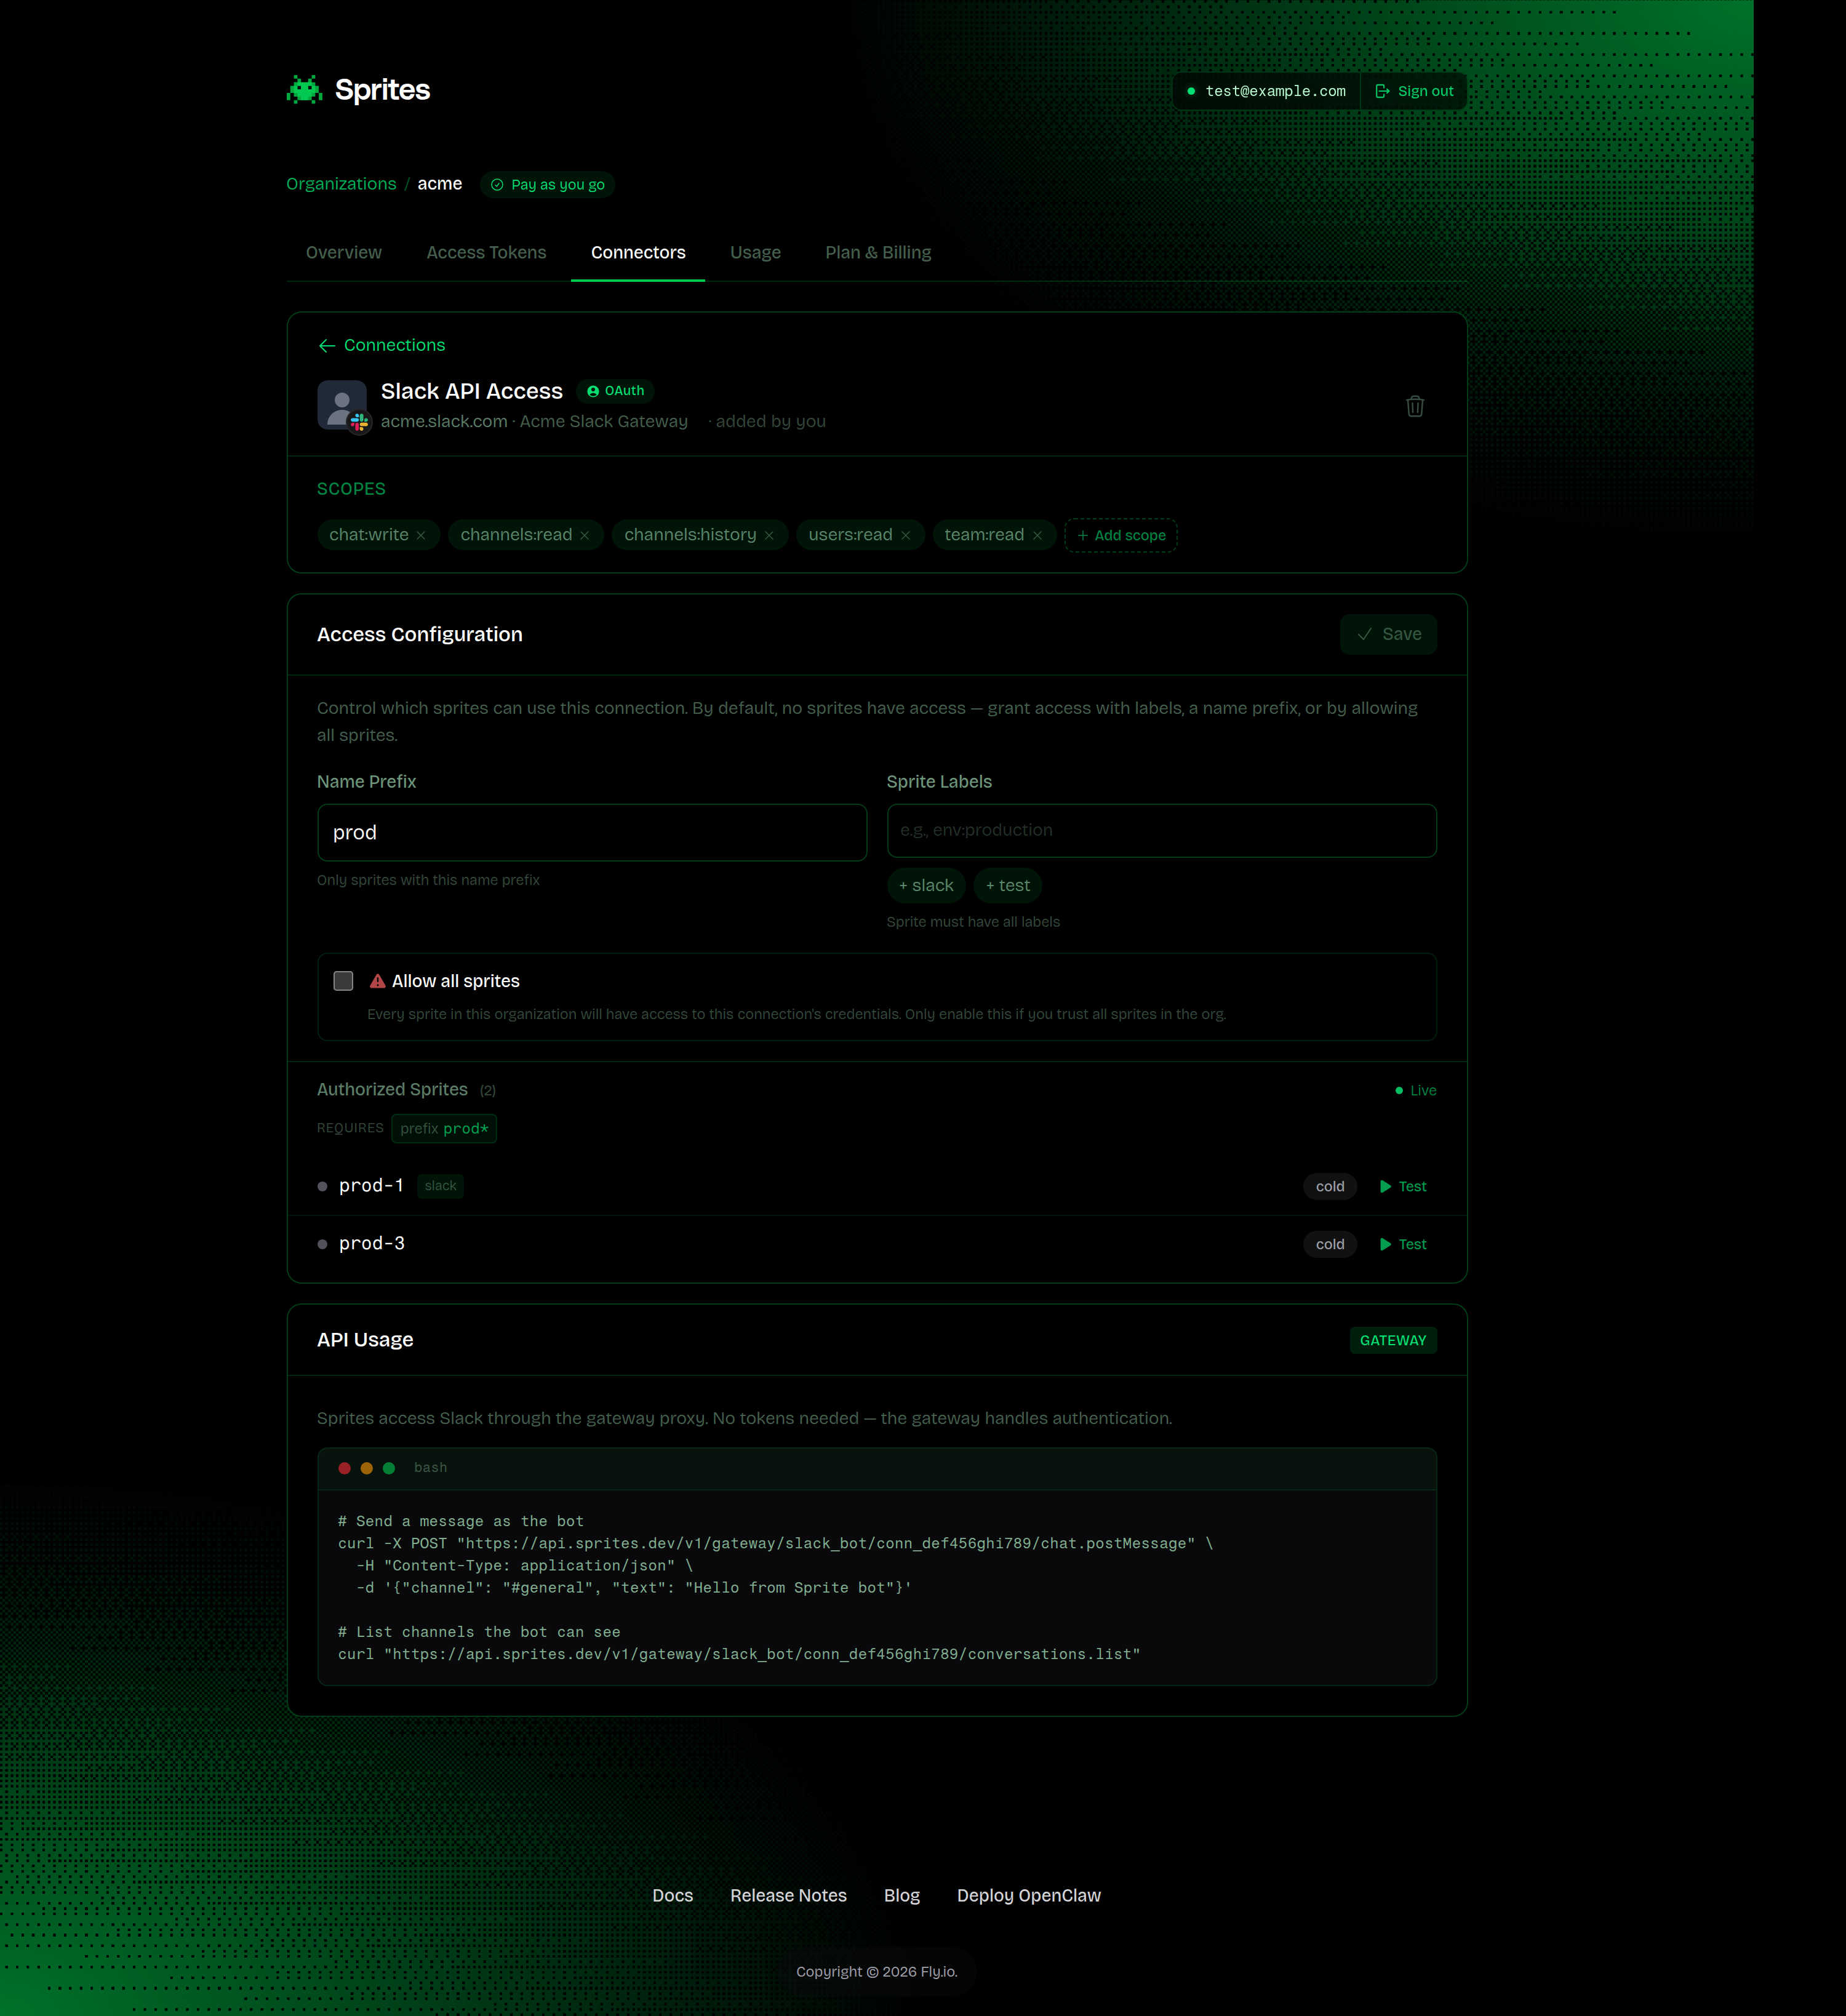
The **Access Configuration** card has three switches:
- **Name Prefix** — only Sprites whose name starts with the value you set (e.g., `prod-` matches `prod-1`, `prod-api`).
- **Sprite Labels** — only Sprites that carry **all** the labels you list. Labels are set on the Sprite, not here.
- **Allow all sprites** — every Sprite in the organization. Use sparingly; the dashboard flags it as a broad permission.
You can combine name prefix and labels — both must match. Allow-all overrides the others.
The **Authorized Sprites** list below the configuration will update live as you change the rules, so you can see exactly which Sprites will gain access before you save.
For OAuth connectors, the **Scopes** section shows what the provider granted, and lets you start an "add scopes" flow if you need more permissions later — Sprites builds the right authorize URL with `add_scopes` set.
The **Gateway Playground** at the bottom lets you fire a real request from any of your Sprites against the connector, without writing any code. Pick a Sprite, choose a method, fill in an endpoint, and hit **Send Request**. It's the fastest way to confirm the policy works end-to-end.
## Calling a connector from a Sprite
Once the policy grants access, a Sprite calls the connector by hitting the gateway URL:
```
https://api.sprites.dev/v1/gateway///
```
No `Authorization` header — the gateway identifies the calling Sprite from Fly.io's request signature. Whatever path you append after the connector ID gets forwarded to the provider with the stored credential attached.
For example, if you set up a Slack-as-Bot connector and granted access to Sprites with the `slack` label:
```bash
curl -X POST "https://api.sprites.dev/v1/gateway/slack_bot/conn_def456ghi789/chat.postMessage" \
-H "Content-Type: application/json" \
-d '{"channel": "#general", "text": "Hello from a Sprite"}'
```
The connector detail page shows the exact gateway URL for each connector — you don't need to construct it by hand.
## Endpoint allow- and block-lists
The access policy can also restrict which provider paths a Sprite can reach through the connector. This is useful when a connector has more permission than you want any single Sprite to use, for example, a Slack bot that can post messages should probably not be able to call admin endpoints.
Endpoint allow- and block-lists aren't yet editable from the dashboard. Set them via the [Connectors API](https://sprites.dev/api/connectors).
Patterns are exact paths or trailing-wildcard prefixes:
- `/chat.postMessage` — exactly that path.
- `/chat.*` — anything starting with `/chat.`.
- `/*` — everything (use sparingly).
Two lists work together:
- **Allowed endpoints** — if set, only matching paths are allowed.
- **Blocked endpoints** — matching paths are rejected. **Note: Block rules are checked before allow rules.**
If a path matches both blocked and allowed rules, the request is denied. Use blocks for an explicit deny-list inside a broad allow rule (for example, allow `/*` but block `/admin.*`).
## Managed providers
For some providers, Sprites offers a **managed connector** — you don't bring your own account or API key. Usage is included in your Sprites plan and billed alongside everything else, so there's no separate provider account to set up, no separate invoice, and no key to rotate.
OpenRouter is currently available as a managed connector, giving Sprites in your organization access to the OpenRouter model catalog without you signing up for OpenRouter at all. More managed providers are planned.
A managed connector behaves exactly like one you set up yourself — you still set an access policy, and the Gateway Playground still works against it.
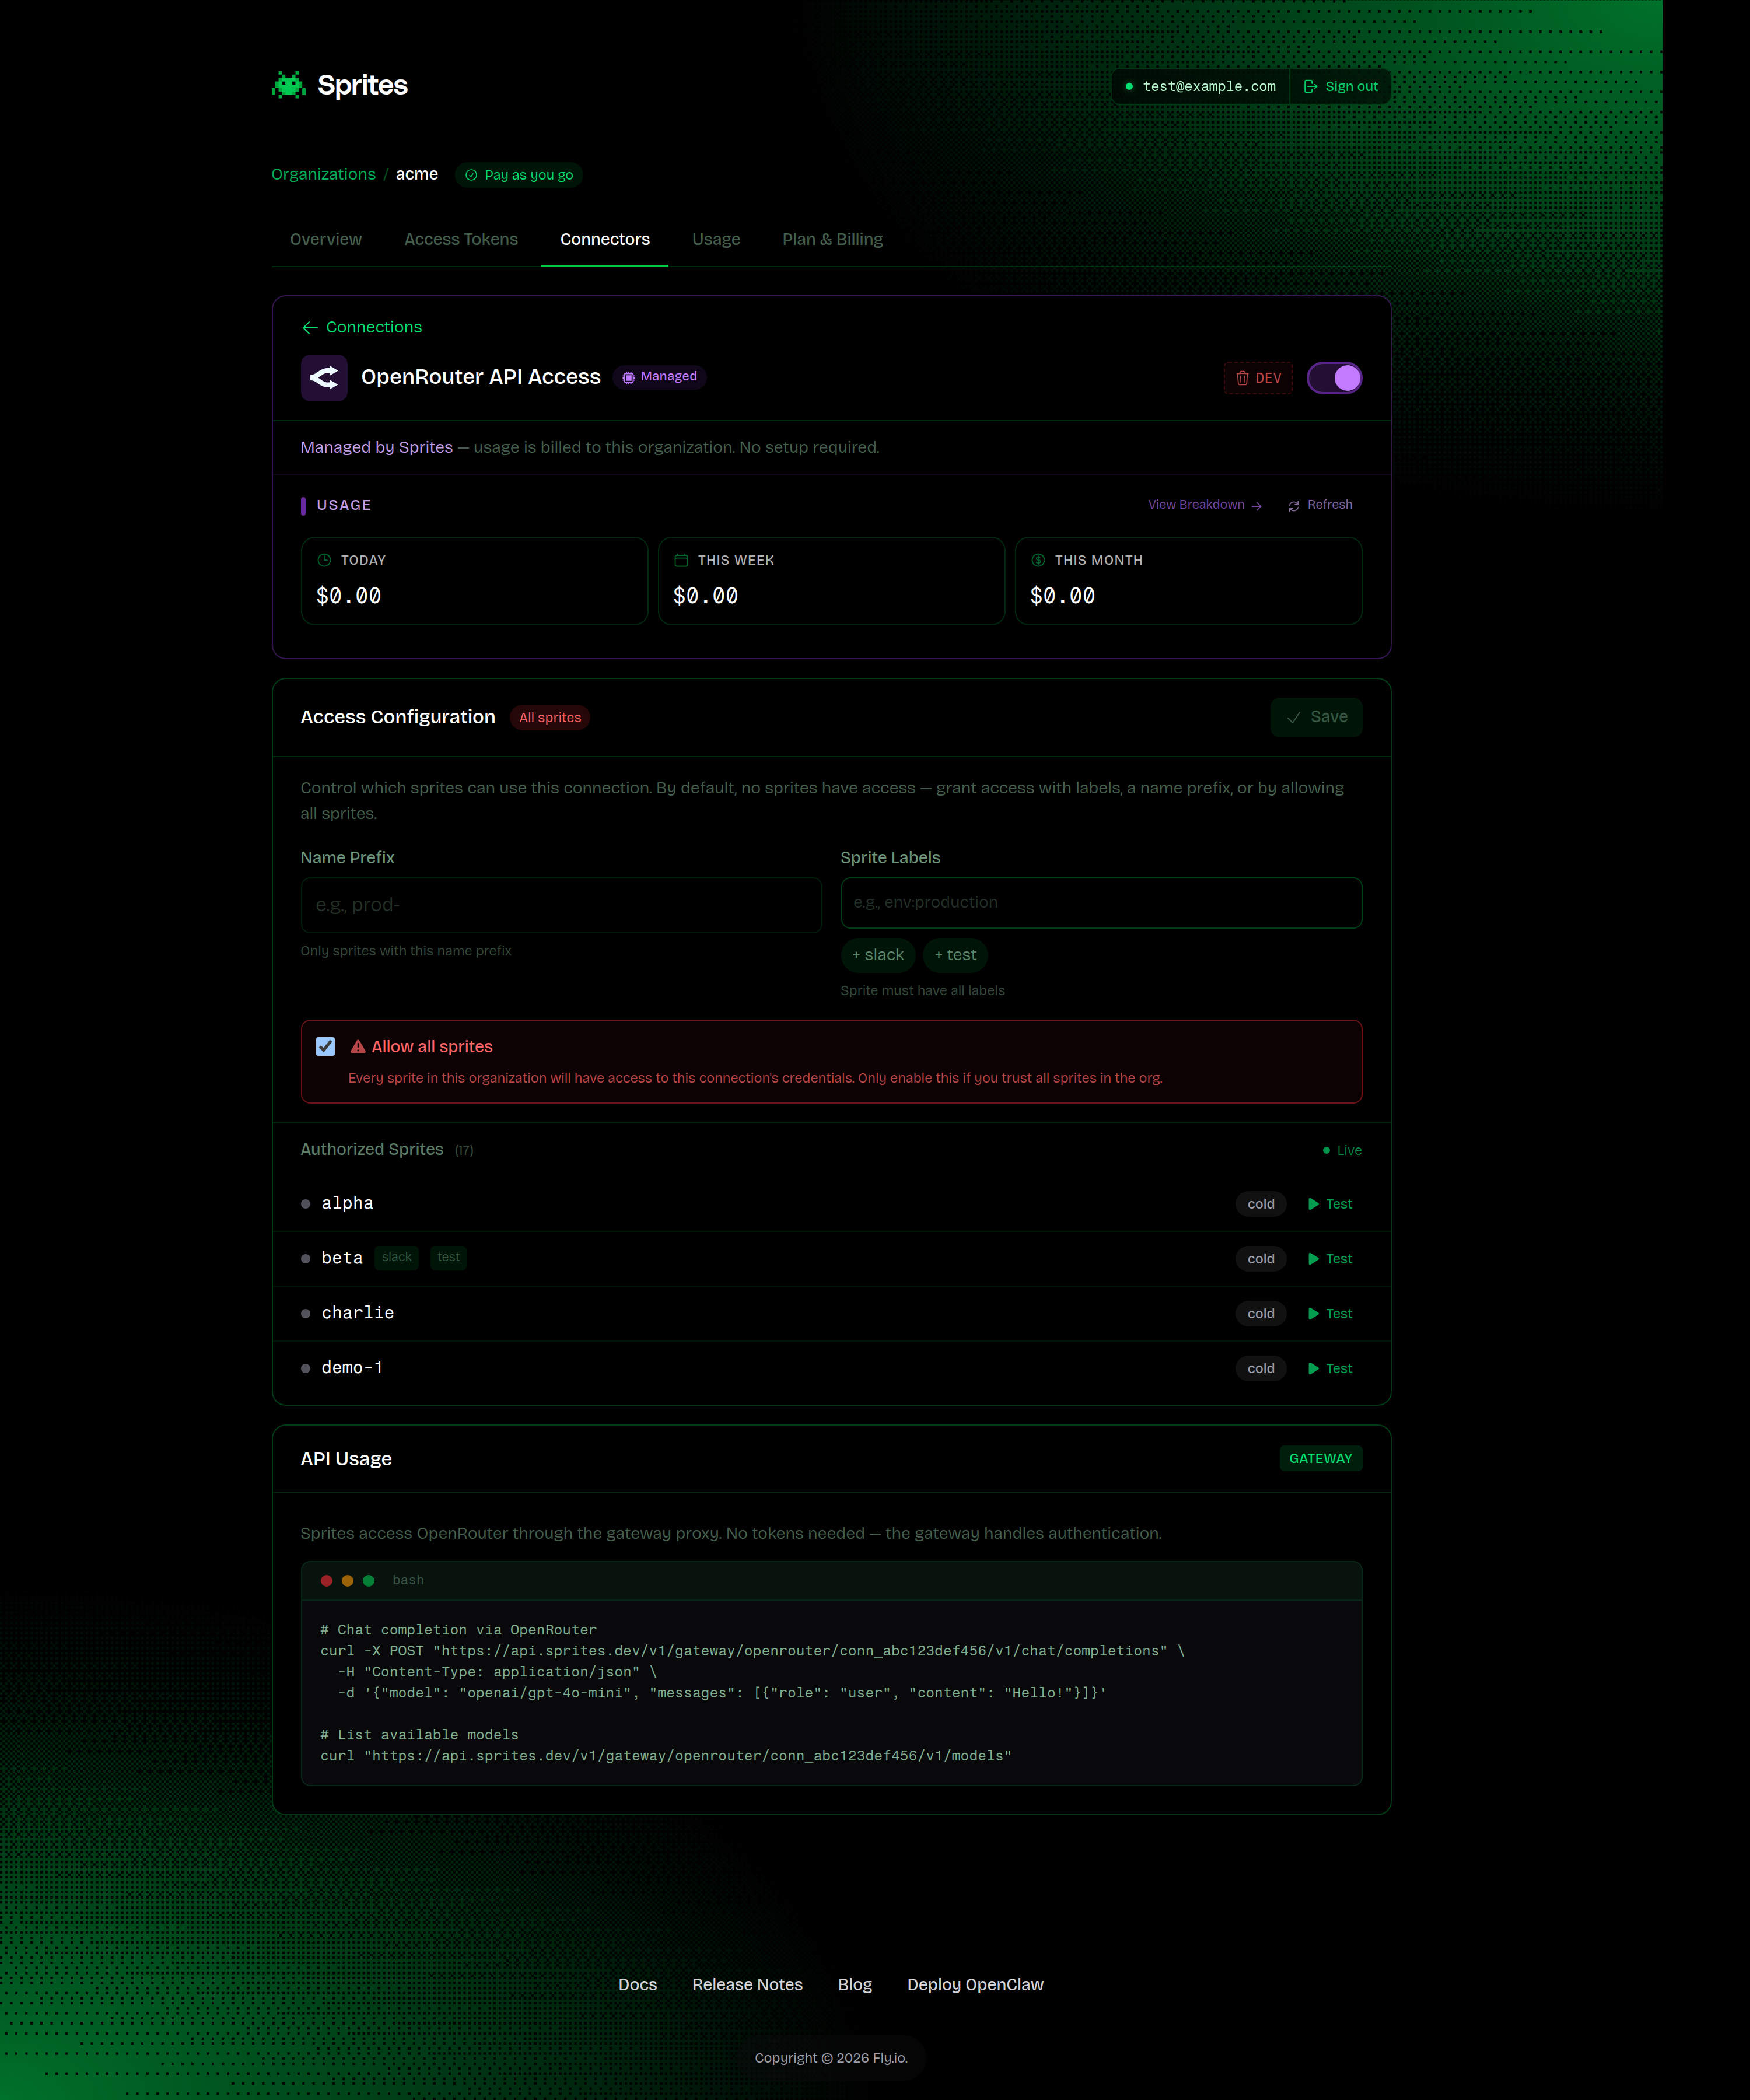
The detail page adds a **Usage** strip at the top showing your spend over the last 24 hours, 7 days, and 30 days. That spend rolls into your Sprites bill.
## Using connectors with a coding agent
Every Sprite ships with the **`sprite-api-gateway`** skill pre-installed for Claude Code, Cursor, Codex, and Gemini. When a coding agent running inside a Sprite needs to talk to an external API, the skill kicks in automatically, so you don't have to teach it any of the URLs above.
Ask in plain language:
> "Post a message to #engineering on Slack saying the deploy finished."
>
> "Open a GitHub issue in my repo titled 'flaky test'."
>
> "List my last 10 OpenRouter completions."
The agent discovers what's available by calling the gateway list endpoint:
```bash
curl -s https://api.sprites.dev/v1/gateway/list
```
The response tells the agent which providers are connected (with their `gateway_base_url` and `usage_snippet`) and which are available but not yet set up (with a `setup_url` to share with you). The agent picks the right connector, builds the call against the gateway, and never sees a raw token.
If the connector exists but is missing scopes the agent needs, the skill points you at a `request_scopes_url` to grant the additional scopes. If no connector exists for the provider, it points you at a `setup_url` to create one.
The practical effect: once an organization admin has set up a Slack or GitHub connector and granted access to the right Sprites, anyone using a coding agent inside one of those Sprites can use the integration in natural language, with no API knowledge required.
The skill is loaded from `~/.claude/skills/sprite-api-gateway/`, `~/.cursor/skills/sprite-api-gateway/`, `~/.codex/skills/sprite-api-gateway/`, and `~/.gemini/skills/sprite-api-gateway/` inside every Sprite. It's part of the Sprite base image, so there's nothing to install.
## Common errors
**`403 forbidden — connection denies all sprites by default`**
The connector has no access policy, or the policy doesn't grant access to the calling Sprite. Open the connector and grant access via labels, name prefix, or allow-all.
**`403 forbidden — endpoint not allowed`**
Either the path matches a blocked endpoint, or an allowed-endpoints list is set and this path isn't on it. Check both lists on the connector's detail page.
**`401 unauthorized` from the gateway**
The request didn't arrive with valid Fly.io identity headers. Gateway calls must originate from inside a running Sprite, not from your laptop or CI.
**OAuth callback returns `failed to exchange authorization code`**
The authorization code was already used or has expired. Restart the connection from the dashboard.
## Automating with the API
Everything in the dashboard is also available as a REST API. Useful when you want to provision connectors as part of an org-setup script, or rotate them programmatically.
### Start an OAuth flow
```bash
curl -X GET "https://api.sprites.dev/v1/oauth/slack/authorize?scopes=chat:write,channels:read" \
-H "Authorization: Bearer $SPRITES_TOKEN"
```
Returns an `authorize_url` and a `state`. Send the user to the URL; on consent, Slack redirects back to the Sprites callback and the connector is created.
### Create an API-key (BYOK) connector
```bash
curl -X POST "https://api.sprites.dev/v1/oauth/connections/api_key" \
-H "Authorization: Bearer $SPRITES_TOKEN" \
-H "Content-Type: application/json" \
-d '{ "provider": "openrouter", "api_key": "sk-or-v1-...", "access_policy": { "allow_all": true } }'
```
### Enable a managed connector
```bash
curl -X POST "https://api.sprites.dev/v1/oauth/connections/provision" \
-H "Authorization: Bearer $SPRITES_TOKEN" \
-H "Content-Type: application/json" \
-d '{ "provider": "openrouter" }'
```
### Update the access policy
```bash
curl -X PUT "https://api.sprites.dev/v1/oauth/connections/" \
-H "Authorization: Bearer $SPRITES_TOKEN" \
-H "Content-Type: application/json" \
-d '{ "access_policy": { "sprite_labels": ["slack"], "allowed_endpoints": ["/chat.*"] } }'
```
### List, inspect, delete
| Operation | Endpoint |
| --- | --- |
| List | `GET /v1/oauth/connections` |
| Get one | `GET /v1/oauth/connections/:id` |
| Delete | `DELETE /v1/oauth/connections/:id` |
Deleting a connector immediately revokes all Sprite access to it. The encrypted credential is destroyed and cannot be recovered — if the connector was OAuth, the user must re-authorize from the dashboard to recreate it.
For the full request and response schemas, see the [API reference](https://sprites.dev/api/connectors).
---
# CLI Reference
## CLI Installation
URL: https://docs.sprites.dev/cli/installation.md
Install the Sprites CLI on macOS, Linux, or Windows

The Sprites CLI (`sprite`) is available for macOS, Linux, and Windows.
## Quick Install (Recommended)
The easiest way to install the CLI is with our install script:
```bash
curl -fsSL https://sprites.dev/install.sh | sh
```
The install script automatically:
- Detects your operating system and architecture
- Downloads the latest release binary
- Verifies the SHA256 checksum
- Installs to `~/.local/bin`
After installation, you may need to add `~/.local/bin` to your PATH if it's not already included. The script will provide instructions if needed.
## Manual Installation
## Verify Installation
```bash
sprite --help
```
You should see the help output with available commands.
## Upgrading
If you installed from the direct download links, upgrade to the latest version:
```bash
sprite upgrade
```
To check for updates without installing:
```bash
sprite upgrade --check
```
## Configuration
The CLI stores configuration in `~/.sprites/sprites.json`. This includes:
- Organization tokens
- Current organization selection
- Current sprite selection
### Config File Location
| Platform | Location |
|----------|----------|
| macOS/Linux | `~/.sprites/sprites.json` |
| Windows | `%USERPROFILE%\.sprites\sprites.json` |
> **Note:** `config.json` is kept for backward compatibility with older clients, but current versions read/write `sprites.json`.
## Optional: Local Directory Context
The CLI supports a `.sprite` file in your project directory to remember which sprite to use:
```bash
# Set the sprite for current directory
sprite use my-project-sprite
```
This creates a `.sprite` file that the CLI reads automatically. Add `.sprite` to your `.gitignore` as it's user-specific.
## Optional: Install Shell Completions
The CLI provides completion scripts for various shells. Run `sprite help completion` for more information.
### bash
Install the bash completion script by adding it to your `.bashrc`:
```bash
echo 'eval "$(sprite completion bash)"' >> ~/.bashrc
```
### zsh
If you haven't enabled completions in your `.zshrc` yet:
```bash
echo "autoload -U compinit; compinit -i" >> ~/.zshrc
```
Install the zsh completion script by adding it to your local functions:
```bash
sprite completion zsh > ~/.local/share/zsh/site-functions/_sprite
# If the local functions directory isn't in your fpath
echo "fpath=(\"$HOME/.local/share/zsh/site-functions\" \$fpath)" >> ~/.zshrc
```
### fish
Install the fish completion script:
```bash
sprite completion fish > ~/.config/fish/completions/sprite.fish
```
### PowerShell
Install the PowerShell completion script by appending it to your profile:
```powershell
Add-Content $PROFILE "`nsprite completion powershell | Out-String | Invoke-Expression"
```
## Troubleshooting
### Permission Denied
If you get a permission denied error on macOS or Linux:
```bash
chmod +x sprite
sudo mv sprite /usr/local/bin/
```
### Command Not Found
Ensure the binary is in your PATH:
```bash
# Check if sprite is in PATH
which sprite
# If not, add /usr/local/bin to PATH
export PATH="/usr/local/bin:$PATH"
```
### macOS Security Warning
On macOS, you may see a security warning when first running the CLI. To allow it:
1. Open System Preferences > Security & Privacy
2. Click "Allow Anyway" next to the message about `sprite`
3. Run `sprite` again and click "Open"
Or use the command line:
```bash
xattr -d com.apple.quarantine /usr/local/bin/sprite
```
## Next Steps
- [Authentication](https://docs.sprites.dev/cli/authentication) - Set up your Fly.io account and manage tokens
- [Commands Reference](https://docs.sprites.dev/cli/commands) - Full CLI documentation and examples
---
## CLI Authentication
URL: https://docs.sprites.dev/cli/authentication.md
Authenticate the Sprites CLI with your Fly.io account
Sprites uses your Fly.io account for authentication. This guide covers setting up authentication and managing API tokens.
## Quick Setup
The simplest way to authenticate:
```bash
sprite org auth
```
This opens a browser window to authenticate with Fly.io. Once complete, you're ready to use Sprites.
## Authentication Flow
### 1. Authenticate with Fly.io
If you're already logged into `flyctl`, the Sprites CLI can use your existing session:
```bash
sprite org auth
```
If you're not logged in or encounter issues:
```bash
# First, ensure you're logged into fly
fly auth logout
fly auth login
# Verify your flyctl session works
fly apps list
# Then authenticate with Sprites
sprite org auth
```
### 2. Select an Organization
If you belong to multiple Fly.io organizations, select one:
```bash
sprite org list
```
Output:
```
Organizations:
personal (current)
my-team
another-org
```
To switch organizations:
```bash
sprite org auth --org my-team
```
## Token Management
You can also create and manage tokens at [sprites.dev/account](https://sprites.dev/account).
### Viewing Your Token
Your Sprites API token is stored securely. To view it:
```bash
# If using keyring storage, disable it first
sprite org keyring disable
# Then check the config file
cat ~/.sprites/sprites.json
```
The token is used for API and SDK authentication.
### Token Storage
By default, tokens are stored in your system keyring for security. You can switch to file-based storage:
```bash
# Disable keyring (stores token in config file)
sprite org keyring disable
# Re-enable keyring storage
sprite org keyring enable
```
### Config File Structure
When using file-based storage, `~/.sprites/sprites.json` contains:
```json
{
"version": "1",
"current_selection": {
"url": "https://api.sprites.dev",
"org": "personal"
},
"urls": {
"https://api.sprites.dev": {
"url": "https://api.sprites.dev",
"orgs": {
"personal": {
"name": "personal",
"keyring_key": "sprites-cli:",
"use_keyring": true,
"sprites": {}
}
}
}
}
}
```
## Multiple Organizations
### Adding Organizations
Add tokens for multiple organizations:
```bash
# Add another organization
sprite org auth --org my-team
```
### Switching Organizations
```bash
# List organizations
sprite org list
# Use a specific org for a command
sprite -o my-team list
# Set default organization
sprite org auth --org my-team
```
### Per-Directory Organization
Use different organizations in different directories:
```bash
cd ~/projects/team-project
sprite use --org my-team my-sprite
cd ~/projects/personal
sprite use --org personal my-personal-sprite
```
The organization is saved in the local `.sprite` file.
## Logging Out
### Remove a Single Organization
```bash
sprite org logout --org my-team
```
### Remove All Credentials
```bash
sprite logout
```
This removes all stored tokens and configuration.
## CI/CD Authentication
For CI/CD or automated environments, use `sprite auth setup --token` to configure authentication:
```bash
# Set up authentication from a token (no browser needed)
sprite auth setup --token "my-org/token-id/secret"
```
You can generate tokens at [sprites.dev/account](https://sprites.dev/account).
### GitHub Actions Example
```yaml
- name: Install Sprites CLI
run: |
curl -fsSL https://sprites.dev/install.sh | bash
echo "$HOME/.local/bin" >> $GITHUB_PATH
- name: Setup Sprites auth
run: sprite auth setup --token "$SPRITES_TOKEN"
env:
SPRITES_TOKEN: ${{ secrets.SPRITES_TOKEN }}
- name: Use Sprites
run: sprite list
```
### Environment Variables
After authentication is configured, you can use environment variables to override settings:
```bash
export SPRITE_ORG="my-org" # Override the default organization
export SPRITES_API_URL="https://api.sprites.dev" # Override API endpoint
```
## Troubleshooting
### "Not authenticated" Error
```bash
# Re-authenticate
sprite org auth
# If that fails, reset and try again
fly auth logout
fly auth login
sprite org auth
```
### Token Not Found
If the CLI can't find your token:
```bash
# Check if using keyring
sprite org keyring disable
# Verify token exists
cat ~/.sprites/sprites.json | grep api_token
# Re-authenticate if needed
sprite org auth
```
### Browser Doesn't Open
If the authentication browser doesn't open automatically:
1. Look for the URL printed in the terminal
2. Copy and paste it into your browser
3. Complete authentication
4. Return to the terminal
### Permission Errors
If you get permission errors after authentication:
1. Verify your Fly.io account has access to the organization
2. Check that your `flyctl` session is valid: `fly apps list`
3. Try re-authenticating: `sprite org auth`
## Security Best Practices
1. **Use keyring storage** (default) for interactive use
2. **Use `sprite auth setup --token`** for CI/CD pipelines with tokens stored as secrets
3. **Never commit** `.sprites/` or `.sprite` files to version control
4. **Rotate tokens** periodically by re-authenticating
5. **Use organization-specific tokens** rather than personal tokens in shared environments
## Next Steps
- [Commands Reference](https://docs.sprites.dev/cli/commands) - Full CLI documentation and command examples
- [Quickstart](https://docs.sprites.dev/quickstart) - Create your first Sprite in minutes
---
## CLI Commands Reference
URL: https://docs.sprites.dev/cli/commands.md
Complete reference for all Sprites CLI commands
Complete reference for all `sprite` CLI commands.
{/* AUTO-GENERATED-CONTENT:START - Do not edit this section */}
## Authentication Commands
### `sprite login`
sprite login - Authenticate with Fly.io
```bash
sprite login [flags] [api-url]
```
**Options:**
- `-o, --org ` - Specify organization
- `-s, --sprite ` - Specify sprite
- `-h, --help Show` - this help message
**Examples:**
```bash
sprite login
sprite login -o my-org
sprite login https://custom-api.sprites.dev
Related Commands:
sprite auth --help Non-interactive token setup (CI/CD)
sprite org --help Manage organizations and tokens after login
```
### `sprite logout`
sprite logout - Remove Sprites configuration
```bash
sprite logout [flags]
```
**Options:**
- `-h, --help Show` - this help message
**Examples:**
```bash
sprite logout
```
### `sprite org auth`
sprite org auth - Add an API token
```bash
sprite org auth [-o :] [api-url|alias] Arguments: api-url|alias Optional API endpoint URL or alias (default: https://api.sprites.dev)
```
**Aliases:** `sprite orgs`, `sprite organizations`, `sprite o`
**Options:**
- `-o, --org ` - Specify organization
- `-h, --help Show` - this help message
**Examples:**
```bash
sprite org auth # Use default API
sprite org auth https://custom-api.sprites.dev # Custom API URL
sprite org auth prod # Use 'prod' alias
sprite org auth -o myorg # Specific organization
sprite org auth -o prod:my-org # Alias with org override
sprite org auth https://staging-api.sprites.dev -o staging:test-org
```
### `sprite org list`
sprite org list - Show configured tokens
```bash
sprite org list [api-url|alias] Arguments: api-url|alias Optional filter by API endpoint URL or alias
```
**Options:**
- `-h, --help Show` - this help message
### `sprite org logout`
sprite org logout - Remove all tokens
```bash
sprite org logout [flags]
```
**Options:**
- `--force Skip` - confirmation prompt
- `-h, --help Show` - this help message
### `sprite org keyring disable`
sprite org keyring disable - Disable keyring usage
```bash
sprite org keyring disable
```
**Options:**
- `-h, --help Show` - this help message
**Examples:**
```bash
sprite org keyring disable
```
### `sprite org keyring enable`
sprite org keyring enable - Enable keyring usage
```bash
sprite org keyring enable
```
**Options:**
- `-h, --help Show` - this help message
### `sprite auth setup`
sprite auth setup - Set up authentication using a pre-generated token.
```bash
sprite auth setup --token
```
**Options:**
- `--token ` - Token in format: org-slug/org-id/token-id/token-value
- `-h, --help Show` - this help message
**Examples:**
```bash
sprite auth setup --token "org-slug/org-id/token-id/token-value"
```
## Sprite Management
### `sprite create`
sprite create - Create a new sprite
```bash
sprite create [flags] [sprite-name]
```
**Options:**
- `-o, --org ` - Specify organization
- `-s, --sprite ` - Specify sprite
- `--skip-console Exit` - after creating instead of connecting to console
- `-h, --help Show` - this help message
> Creates a new sprite with the specified name.
> The sprite will be created in the selected organization.
> If sprite name is not provided, you will be prompted.
> Lifecycle:
> - Sprites pause when idle (no HTTP requests and no active sessions)
> - Services keep sprites alive and auto-restart on boot
> - Use checkpoints to save and restore filesystem state
> Related Commands:
> sprite list --help List your sprites
> sprite destroy --help Delete a sprite permanently
> sprite console --help Open an interactive shell
**Examples:**
```bash
sprite create my-sprite
sprite create -o myorg development-sprite
sprite create
```
### `sprite use`
sprite use - Activate a sprite for the current directory
```bash
sprite use [flags] [sprite-name]
```
**Options:**
- `-o, --org ` - Specify organization
- `-s, --sprite ` - Specify sprite
- `--unset Remove` - the .sprite file from current directory
- `-h, --help Show` - this help message
> Creates a .sprite file in the current directory to set the active sprite.
> This file will be used by other commands when no sprite is explicitly specified.
> Similar to 'nvm use' or 'asdf local' for version management.
> If no sprite name is provided, shows an interactive list to choose from.
**Examples:**
```bash
sprite use my-sprite
sprite use -o myorg dev-sprite
sprite use
```
### `sprite list`
sprite list - List all sprites
```bash
sprite list [flags]
```
**Aliases:** `sprite ls`
**Options:**
- `-o, --org ` - Specify organization
- `-s, --sprite ` - Specify sprite
- `-w, --watch Watch` - for live updates
- `--prefix ` - Filter sprites by name prefix
- `-h, --help Show` - this help message
> Lists all sprites in the selected organization.
> Use --prefix to filter sprites by name prefix.
**Examples:**
```bash
sprite list
sprite list -o myorg
sprite list --prefix dev
```
### `sprite destroy`
sprite destroy - Destroy a sprite
```bash
sprite destroy [flags] [sprite-name]
```
**Options:**
- `-o, --org ` - Specify organization
- `-s, --sprite ` - Specify sprite
- `--force Skip` - confirmation prompt
- `-h, --help Show` - this help message
**Examples:**
```bash
sprite destroy mysprite
sprite destroy -o myorg mysprite
sprite destroy -s mysprite
sprite destroy --force mysprite # Skip confirmation
Related Commands:
sprite create --help Create a new sprite
sprite checkpoint --help Save state before destroying
```
## Command Execution
### `sprite exec`
sprite exec - Execute a command in the sprite environment
```bash
sprite exec [flags] [args...]
```
**Aliases:** `sprite x`
**Options:**
- `-o, --org ` - Specify organization
- `-s, --sprite ` - Specify sprite
- `--dir ` - Working directory for command
- `--tty Allocate` - pseudo-TTY
- `--env ` - Environment variables (KEY=value,KEY2=value2)
- `--http-post Use` - HTTP/1.1 POST instead of WebSockets (non-TTY only)
- `--file ` - Upload file before exec (repeatable)
- `-h, --help Show` - this help message
> When using --tty, terminal environment variables (TERM, COLORTERM, LANG,
> LC_ALL) are automatically passed through from your local environment.
> Use 'sprite sessions' to list, attach to, or kill running sessions.
**Examples:**
```bash
sprite exec ls -la
sprite exec --dir /app echo hello world
sprite exec --env KEY=value,FOO=bar env
sprite exec --tty /bin/bash
sprite exec -o myorg -s mysprite npm start
```
### `sprite console`
sprite console - Open an interactive shell in the sprite environment
```bash
sprite console [flags]
```
**Aliases:** `sprite c`
**Options:**
- `-o, --org ` - Specify organization
- `-s, --sprite ` - Specify sprite
- `-h, --help Show` - this help message
> Opens an interactive shell with a TTY allocated.
> Uses shell environment variables to determine which shell to use.
> Supported shells: bash, zsh, fish, tcsh, ksh.
> Falls back to bash if shell detection fails.
> Detach with Ctrl+\ to leave the session running in the background.
> Related Commands:
> sprite exec --help Run a command without an interactive shell
> sprite attach --help Reconnect to a detached session
> sprite sessions --help List and manage running sessions
**Examples:**
```bash
sprite console
sprite console -o myorg -s mysprite
```
## Checkpoints
### `sprite checkpoint create`
sprite checkpoint create - Create a new checkpoint
```bash
sprite checkpoint create [flags]
```
**Options:**
- `-o, --org ` - Specify organization
- `-s, --sprite ` - Specify sprite
- `--comment ` - Optional comment describing this checkpoint
- `-h, --help Show` - this help message
### `sprite checkpoint list`
sprite checkpoint list - List all checkpoints
```bash
sprite checkpoint list [flags]
```
**Aliases:** `sprite checkpoint ls`, `sprite checkpoints ls`
**Options:**
- `-o, --org ` - Specify organization
- `-s, --sprite ` - Specify sprite
- `--history ` - Filter by history version
- `--include-auto Include` - auto-generated checkpoints
- `-h, --help Show` - this help message
### `sprite checkpoint info`
sprite checkpoint info - Show information about a specific checkpoint
```bash
sprite checkpoint info [flags]
```
**Options:**
- `-o, --org ` - Specify organization
- `-s, --sprite ` - Specify sprite
- `-h, --help Show` - this help message
**Examples:**
```bash
sprite checkpoint info v2 # Show details for checkpoint v2
```
### `sprite checkpoint delete`
sprite checkpoint delete - Delete a checkpoint
```bash
sprite checkpoint delete [flags]
```
**Aliases:** `sprite checkpoint rm`
**Options:**
- `-o, --org ` - Specify organization
- `-s, --sprite ` - Specify sprite
- `-h, --help Show` - this help message
**Examples:**
```bash
sprite checkpoint delete v3 # Delete checkpoint v3
```
### `sprite restore`
sprite restore - Restore from a checkpoint version
```bash
sprite restore [flags]
```
**Aliases:** `sprite checkpoint restore`
**Options:**
- `-o, --org ` - Specify organization
- `-s, --sprite ` - Specify sprite
- `-h, --help Show` - this help message
**Examples:**
```bash
sprite restore v1
sprite restore -o myorg -s mysprite v2
# Safe restore workflow
sprite checkpoint create --comment "before rollback"
sprite restore v1
See also:
sprite checkpoint --help Full checkpoint documentation
```
## Networking
### `sprite proxy`
sprite proxy - Forward local ports through the remote server proxy
```bash
sprite proxy [flags] [port2] ... or [local2:remote2] ...
```
**Options:**
- `-o, --org ` - Specify organization
- `-s, --sprite ` - Specify sprite
- `-W, --stdio <[host]:port>` - Forward stdin and stdout to host:port on the Sprite
- `-h, --help Show` - this help message
> Each port will be forwarded from localhost to the remote environment.
> Use LOCAL:REMOTE syntax to map different local and remote ports.
> Multiple ports can be specified to forward multiple services simultaneously.
> Related Commands:
> sprite url --help Manage the sprite's always-on HTTP URL
**Examples:**
```bash
sprite proxy 8080
sprite proxy 3000 8080
sprite proxy 4005:4000
sprite proxy 3001:3000 8081:8080
sprite proxy -W :22
sprite proxy -o myorg -s mysprite 8080
```
### `sprite url`
sprite url - Manage sprite URL settings
```bash
sprite url Show sprite URL and auth setting sprite url update [flags] Update URL authentication settings URL Format: https://-.sprites.dev/ Authentication Modes: sprite Allows access via browser to Sprite org members, and via org tokens (default) public No authentication - anyone with URL can access Subcommands: update Update URL authentication settings
```
**Options:**
- `-o, --org ` - Specify organization
- `-s, --sprite ` - Specify sprite
- `-h, --help Show` - this help message
- `--auth ` - Authentication type: 'public' or 'sprite'
**Examples:**
```bash
sprite url # Show current URL and auth setting
sprite url update --auth public # Make URL publicly accessible
sprite url update --auth sprite # Require org membership (default)
sprite url -o myorg -s mysprite # Show URL for specific sprite
Accessing Authenticated URLs:
Visit the URL in your browser and log in with Fly.io, or use an org token:
curl -H "Authorization: Bearer $SPRITE_API_TOKEN" https://mysprite-myorg.sprites.dev/
Security Notes:
- Public URLs are accessible to anyone on the internet
- Never expose secrets, env vars, or sensitive data via HTTP
- Use 'public' only for demos, webhooks, or truly public services
```
### `sprite url update`
sprite url update - Update URL authentication settings
```bash
sprite url update --auth [flags] Authentication Types: sprite Require org membership to access (default) public No authentication - anyone with URL can access
```
**Options:**
- `-o, --org ` - Specify organization
- `-s, --sprite ` - Specify sprite
- `-a, --auth ` - Authentication type: 'public' or 'sprite'
- `-h, --help Show` - this help message
**Examples:**
```bash
sprite url update --auth public # Make URL publicly accessible
sprite url update --auth sprite # Require org membership (default)
sprite url update --auth public -s demo # Make specific sprite public
```
## Utility Commands
### `sprite api`
sprite api - Make authenticated API calls with curl
```bash
sprite api [flags] [curl options]
```
**Options:**
- `-o, --org ` - Specify organization
- `-s, --sprite ` - Specify sprite
- `-h, --help Show` - this help message
> This command wraps curl to automatically add authentication headers.
> If a sprite is specified with -s, the path is relative to /v1/sprites/``/.
> If no sprite is specified, the path is relative to /v1/.
> Paths starting with /v1/sprites/ are always used as-is, ignoring any sprite context.
> All arguments after the path are passed directly to curl.
**Examples:**
```bash
sprite api -o myorg /sprites
sprite api -o myorg -s my-sprite /upgrade -X POST
sprite api -o myorg -s my-sprite /exec -X GET
sprite api -o myorg -s my-sprite /checkpoints
```
### `sprite upgrade`
sprite upgrade - Upgrade the sprite client to the latest version
```bash
sprite upgrade [flags]
```
**Options:**
- `--check Check` - for updates without installing
- `--force Force` - upgrade even if already up to date
- `--version ` - Upgrade to a specific version
- `--channel ` - Release channel (release, rc, dev)
- `-h, --help Show` - this help message
**Examples:**
```bash
sprite upgrade # Upgrade to the latest version
sprite upgrade --check # Check for available updates
sprite upgrade --force # Force upgrade even if up to date
sprite upgrade --channel dev # Switch to the dev channel
sprite upgrade --channel rc # Switch to the rc channel
```
{/* AUTO-GENERATED-CONTENT:END */}
## Exit Codes
| Code | Meaning |
|------|---------|
| 0 | Success |
| 1 | General error |
| 2 | Command not found |
| 126 | Command cannot execute |
| 127 | Command not found (in sprite) |
| 128+ | Command terminated by signal |
## Environment Variables
| Variable | Description |
|----------|-------------|
| `SPRITE_TOKEN` | API token override (legacy; falls back if no stored token) |
| `SPRITE_URL` | Direct sprite URL (for local/dev direct connections) |
| `SPRITES_API_URL` | API URL override (default: `https://api.sprites.dev`) |
## Configuration Files
### Global Config
`~/.sprites/sprites.json` (managed by the CLI; format may evolve):
```json
{
"version": "1",
"current_selection": {
"url": "https://api.sprites.dev",
"org": "personal"
},
"urls": {
"https://api.sprites.dev": {
"url": "https://api.sprites.dev",
"orgs": {
"personal": {
"name": "personal",
"keyring_key": "sprites-cli:",
"use_keyring": true,
"sprites": {}
}
}
}
}
}
```
### Local Context
`.sprite` (in project directory):
```json
{
"organization": "personal",
"sprite": "my-project-sprite"
}
```
## Related Documentation
- [Installation](https://docs.sprites.dev/cli/installation) - Install the Sprites CLI on your platform
- [Authentication](https://docs.sprites.dev/cli/authentication) - Set up your Fly.io account and manage tokens
- [Working with Sprites](https://docs.sprites.dev/working-with-sprites) - Beyond the basics guide
- [Checkpoints](https://docs.sprites.dev/concepts/checkpoints) - Save and restore sprite state
---
# Integrations
## Remote MCP Server
URL: https://docs.sprites.dev/integrations/remote-mcp.md
Connect MCP clients to Sprites with the hosted remote MCP server
Sprites runs a hosted MCP server. Connect an MCP client to it and the client can control Sprites directly. It can create and manage them, run commands, inspect checkpoints, and change network policy through standard MCP tools.
Why use it? Your MCP client gets persistent, isolated Linux environments without you pasting API tokens into a prompt or running a local MCP bridge.
## MCP server URL
Use this URL when adding the connector:
```text
https://sprites.dev/mcp
```
The connector uses OAuth. During setup, you sign in with your Fly.io account, choose the organization the client should use, and approve the level of Sprites access for that connector.
## Add the connector
1. Open your MCP client's connector settings.
2. Add a remote (or custom) MCP connector. Different clients label this differently. Look for "Remote MCP server", "Custom connector", or similar.
3. Enter `https://sprites.dev/mcp`.
4. Follow the browser authentication flow for Fly.io.
5. Choose the Sprites organization the connector should use.
6. Review the token restrictions on the consent screen and approve the connection.
If your client asks for a connector name, use `Sprites`.
## Permissions
The default token is restricted. The connector can only create Sprites whose names start with `mcp-`, and it can only create a limited number of them.
You can change both on the consent screen: pick a different name prefix, raise or lower the cap, or switch to full access if you want the connector to act on the whole organization without those guardrails.
Full access lets the connector manage any Sprite the selected organization token can access. Use restricted mode unless your workflow needs broader control.
## Available tools
MCP clients see Sprites as tools. There are two layers: organization-level tools that act across your Sprites, and Sprite-level tools that act inside a specific one.
### Organization tools
| Tool | Access | What it does |
|------|--------|--------------|
| `list_sprites` | Read-only | Lists Sprites visible to the authenticated organization and token policy. |
| `create_sprite` | Destructive | Creates a Sprite in the selected organization. |
| `destroy_sprite` | Destructive | Permanently destroys a Sprite. |
### Sprite tools
The Sprite-level tools are generated from the public Sprite environment API. The exact list may change as new Sprite environment versions ship, but commonly includes:
| Category | Examples |
|----------|----------|
| Exec | Run a command, list exec sessions, kill a session |
| Checkpoints | Create, list, inspect, and restore checkpoints |
| Network policy | Read or update outbound network rules |
| Services | List, create, start, stop, and inspect background services |
| Service logs | Read recent service logs |
Tools are annotated as either read-only or destructive. Your MCP client may ask for additional confirmation before using destructive tools, depending on its settings.
## Safety model
Sprites are isolated Linux environments. That isolation is useful for agent work, but MCP tools can still perform real actions in your organization.
- `destroy_sprite` permanently deletes a Sprite and its data. There is no undo.
- Command execution can modify files, install packages, start services, or use network access allowed by the Sprite policy.
- Checkpoint restore rewinds a Sprite to a previous filesystem state. Any work done since that checkpoint is gone.
- Network policy updates can allow or block outbound access from a Sprite.
For safer workflows, use a restricted OAuth token, pick a clear name prefix such as `mcp-`, and create a fresh Sprite for experiments.
## Example requests
```text
Create a Sprite named mcp-demo, run python --version, and tell me what runtime is installed.
```
```text
Create a checkpoint on mcp-demo before making changes. Then install ripgrep and verify rg --version.
```
```text
List my Sprites with the mcp- prefix and summarize which ones are running.
```
## Troubleshooting
### The client cannot connect
Check that the connector URL is exactly:
```text
https://sprites.dev/mcp
```
The MCP endpoint is not the REST API host. Do not use `https://api.sprites.dev`.
### Authentication loops or fails
Sign out of Fly.io in your browser, sign in again, and retry the connector flow. If you belong to multiple organizations, make sure you select the one that should own Sprites created through MCP.
### A Sprite is not found
The Sprite may belong to a different organization, may be outside the token's allowed name prefix, or may have been destroyed. Call `list_sprites` and verify the exact Sprite name.
### A parameter is missing
Some tools require an existing Sprite name, service name, checkpoint ID, or exec session ID. List the relevant resource first, then retry the tool call with the exact identifier.
### A Sprite is starting
Cold Sprites can take a moment to wake. If the client receives a retry message, wait a few seconds and run the same tool again.
## REST API reference
The MCP server wraps the same Sprite capabilities documented in the [Sprites API reference](https://sprites.dev/api). Use the API reference when you want endpoint schemas, SDK examples, or direct REST access instead of MCP.
---